My 52-week photography is going well. I've shot my images on weekends and posting them on the blog on Sunday evenings. I spend time during the week thinking and planning the what and where of the images I want to capture. It has worked well.
I was on 500.px and Google+ this week looking at some of the incredible HDR images captured by +Trey Ratcliff and others. This weekend I wanted to do more HDR imagery and thought that perhaps the Princeton University Chapel might be a great place to try. The chapel has very beautiful stained glass windows that reflect light all around the inside of this beautiful building.
Planning out your photo shoot is important. You want to consider what equipment you might need -- lens, tripod, etc -- and think about the lighting conditions for the time of day. You also want to make sure that you know whether the location might be crowded. You don't want to set up a tripod in a hallway that might be crowded or where people might be might get in the way of your shot.
After deciding to shoot the chapel I researched the operating hours and timing of any services. I wanted to be sure the chapel would be empty so I planned on being there around 9 AM. I wanted to create HDR images so that meant using my gPhoto Raspberry Pi kit or Sofortbild with a tripod and my AF-S DX Zoom-Nikkor 18-55mm f/3.5-5.6G. Things didn't work out the way I had planned.
When I got inside the Chapel was empty except for two people sitting near the back. I had noted the sign outside the chapel indicating that services started at 11 AM today. I looked around to find the spot down the middle of the pews to set up my tripod. Before I could even get the tripod open one of the two people yelled at me that I could not set up my tripod because of services. I played stupid, asking her what time services started. "10 AM", she insisted. I persisted, "This will only take me 10 minutes". "No", she insisted worshippers would be arriving any minute. I put my tripod down and looked around. Perhaps I could come back another day. The Chapel is open from 7 AM to 7 PM daily during the school year. After about 20 minutes -- no one came in or out during this time -- I picked up my camera bag and left feeling a bit dejected.
I tried not to let the encounter bother me. I chalked it up to meet the wrong person on a wrong day.
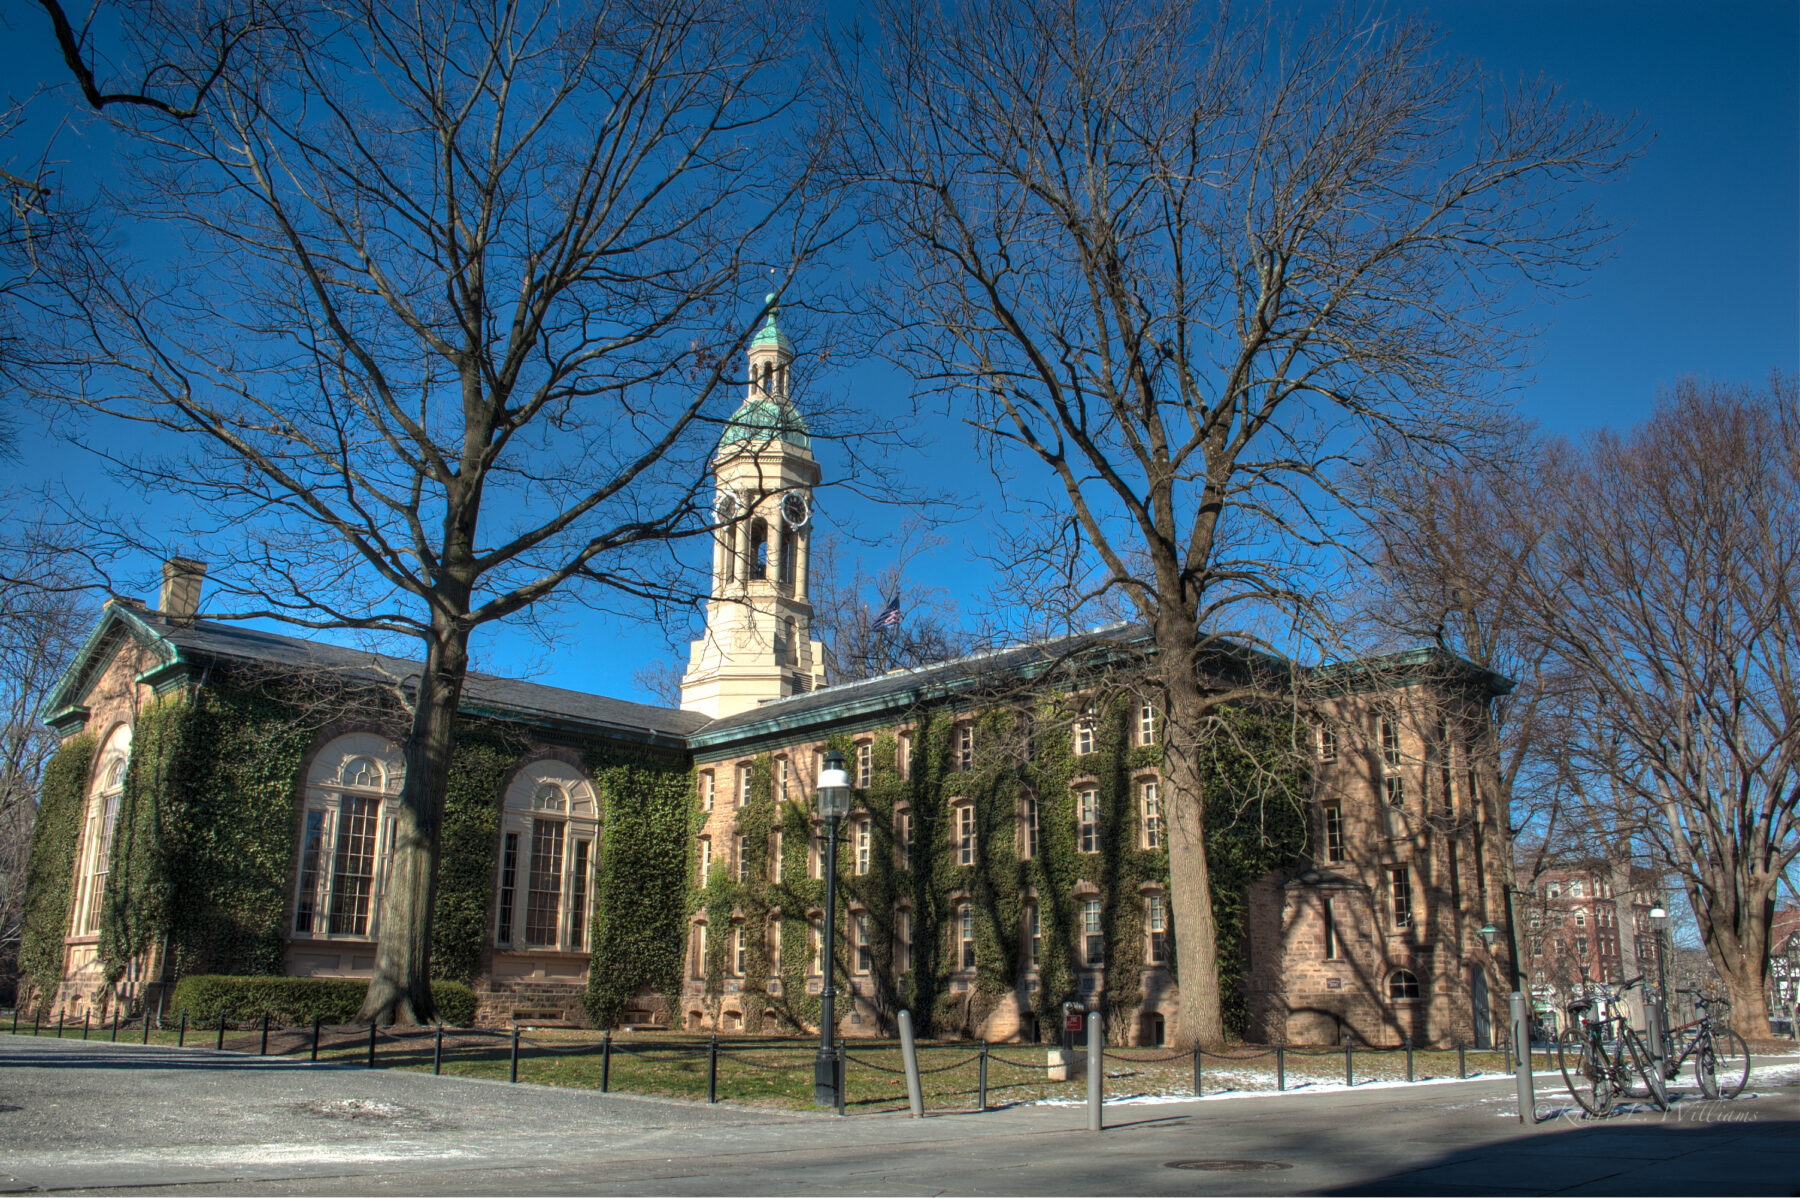
I walked around -- it was very cold outside -- trying to find another subject. The campus doesn't have much colour this time of the year; mostly shades of grey. My hands were starting to feel numb so I set up my tripod and captured a few exposures of the back of Nassau Hall before walking over to Panera for a hot coffee. Brr.
The image is an 8 exposure HDR (+/-1 EV steps) taken with my gPhoto-Raspberry Pi rig and combined and tone mapped in Photomatix Pro with minor adjustments in Adobe Lightroom.
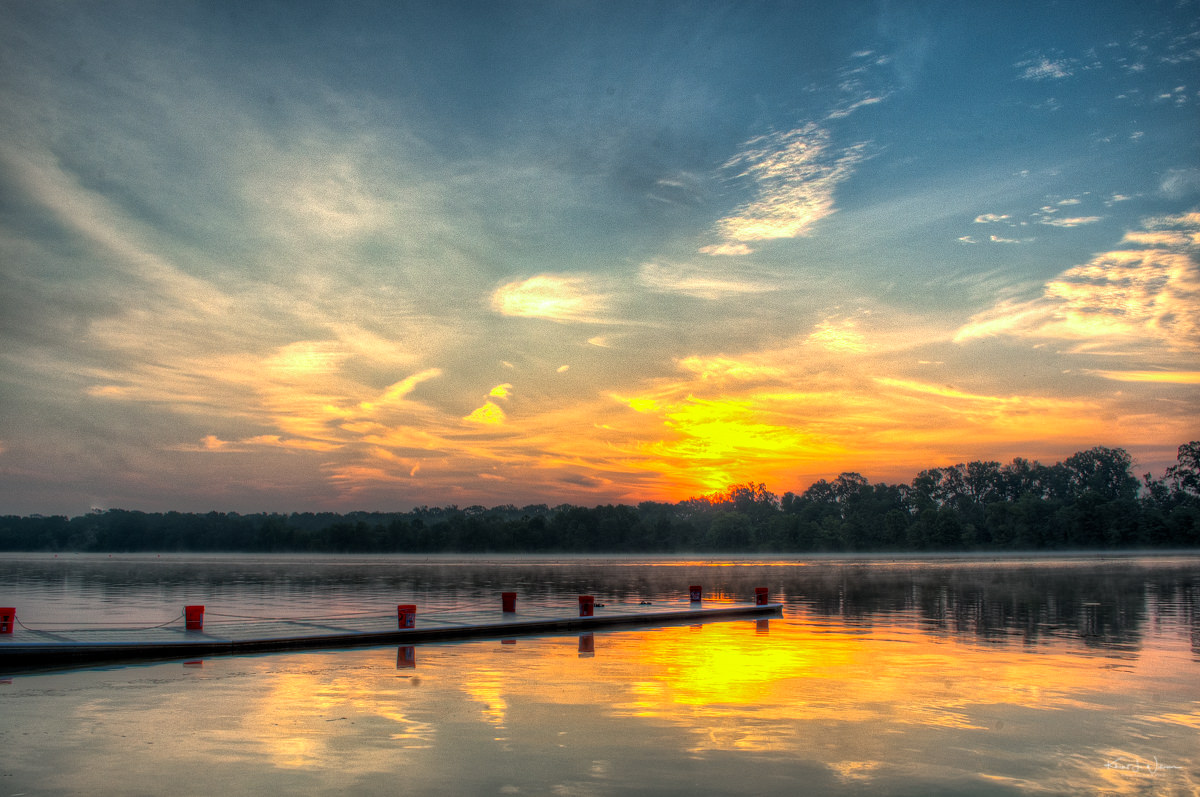
This is one of a series of HDR images I processed earlier this week. I wanted to test out a project a very geeky HDR project1 I had completed. I find that the early morning light is sometimes ideal for HDR so I hopped in my car thinking I would head over to the old mill house in Kingston. But as I drove I looked at the sky and decided that Carnegie Lake might be better. I wanted to capture the sunrise. I’m not sure I captured what I saw but I enjoyed the process. Maybe tomorrow I’ll go back and try it again.
UPDATE: See my new blog post where I rewrote the code in Perl and added a trigger for the Pi.
I bought my Nikon D40 in 2006. The D40 is my first and only DSLR camera and I've loved using it every day that I've had it. At the time, it was Nikon's entry-level DSLR and it suited my budget and photography skills. Over the last 6 years that I've owned the device my photography skills have improved but not my budget 1. I’d had to make do with the limitations of the D40 — 6-megapixel DX sensor, 200-3200 ISO range, no auto-bracketing — but the lack of auto-bracketing has been the most limiting.
I love making high dynamic range (HDR) 2 photographs. I love how my photographs come alive with the expanded range offered by HDR. HDR photography involves taking multiple photographs at varying exposure levels and combining the photos into a single final image. HDR photography requires a good tripod and a camera that can shoot bracketed photos. Having a camera body with auto-bracketing makes this easy. On the D40 I can manually adjust the exposure values (EV) between each capture but I risk moving the camera. A slight movement can make aligning the images much harder.
I’ve researched various solutions for my problem. I used a Mac app, Sofortbild, to tether my D40 to my MacBook via USB. Sofortbild provides complete remote control of a Nikon DSLR camera — like shutter speed, aperture, exposure, white balance, iso, image format — and automatically transfers captures images to the Mac hard drive. It can also auto-import images into iPhoto, Aperture or Adobe Lightroom. However, I was interested in its use for HDR photography.
Perform bracketing with an arbitrary number of exposure values by defining the minimum and maximum shutter speed and step. After bracketing high dynamic range images can automatically be calculated including auto image alignment and saved in all major high dynamic range image file formats. Filenames will get the same index including incrementing suffix for easier workflows with external high dynamic range applications.
Sofortbild is easy to use and fully functional but … the setup wasn’t only practical in a studio or controlled set. I just didn’t see myself lugging a laptop, tripod, camera, and lenses around. With a MacBook Air, maybe. A 7 lb MacBook. No. I wanted something lighter.
I started researching options to control the brackets using my iPhone. Searching the web I found a project called DSLR.bot. The creator wrote an iPhone/iPad (iOS) app that could trigger an IR LED to send the correct binary sequence to trigger the IR on the Nikon. The creator sells a pre-built IR remote but I built one myself. However, the author of the app limited the fastest shutter speed to 3⁄10 second. This was too slow for my daylight HDR. Most of my test shots were completely blown out in the highlights.
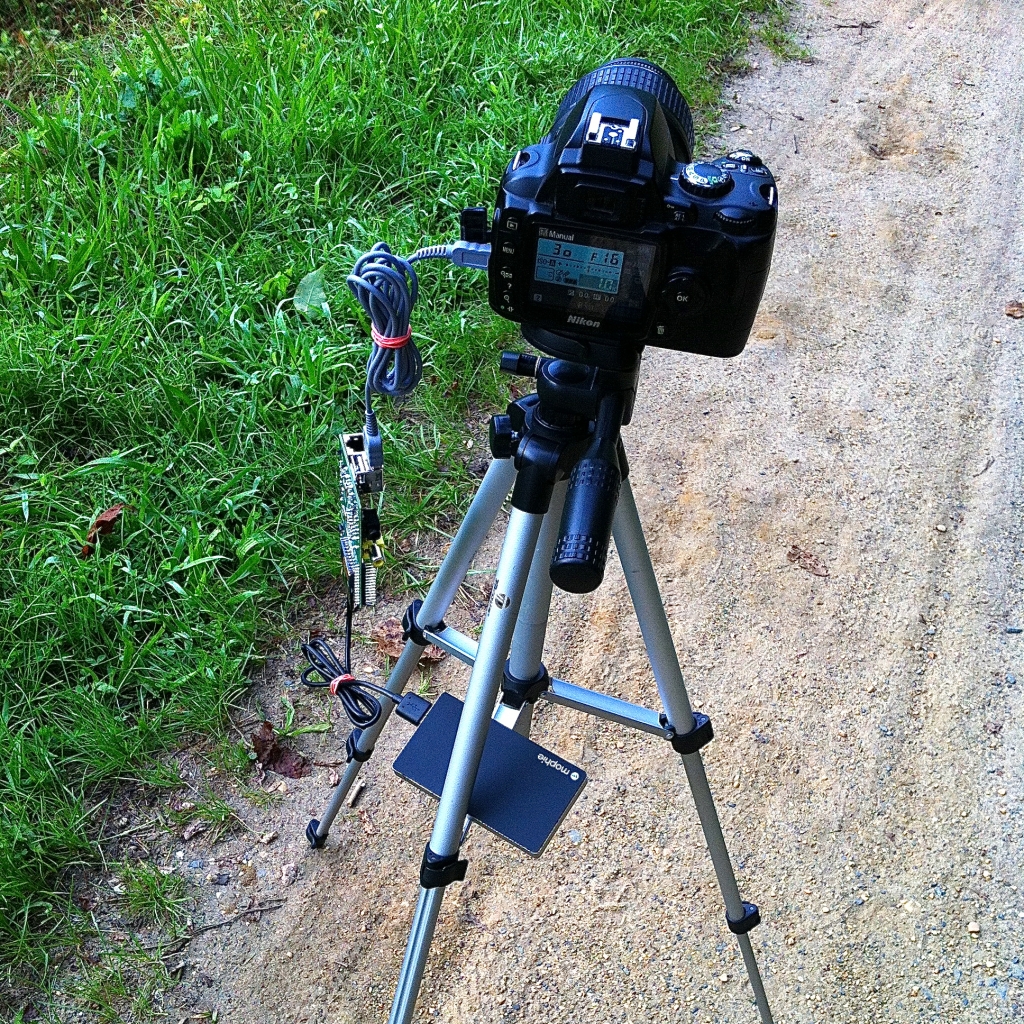
My D40 auto-bracketing kit.
When the Raspberry Pi single-board computer was announced I could immediately see the usefulness of such a small. I ordered one and four months later I could start working on my first project. I planned to use the Raspberry Pi to control my Nikon via USB and capture bracketed images.
After much research and trial and error, I think I have a working solution.
 My D40 auto-bracketing kit.
I used an OS X user account that has administrator privileges to install Raspbian “wheezy” Linux onto a 4GB SD card. The card was mounted on my OS X 10.8 iMac via a Moshi card reader. I followed the instruction on the Wiki but with some small tweaks. A little trial and error and I had a working RPi.
The Wiki did not make it clear that I needed to issue the commands from an account with system administrator privileges and that the diskutil commands must be executed using sudo. I was frustrated running these commands until I understood that little detail.
It is necessary to unmount the partition so that you will be allowed to overwrite the disc:
Using the device name of the partition, in my case /dev/disk4s1, I got the raw device name for the entire disc, by omitting the last "s1" and replacing "disc" with "rdisk”. So my raw device name was /dev/rdisk4.
In the terminal I wrote the image to the card with this command, using the raw disc device name from above.
Once complete, I unmounted the SD card and inserted it into the slot on my Raspberry Pi. I hooked up the Raspberry Pi to my home network via my AirPort Express via an Ethernet cable. My RPi was powered by a USB charger I picked up from Radio Shack. I planned to get the device controlling my camera with a script and power the device from the Mophie Juice Pack Powerstation battery/a>.
gPhoto2
Since I planned to use the RPi to control my Nikon D40 for exposure bracketing of images for HDR photography, I needed software to send Picture Transfer Protocol (PTP) commands to my Nikon. My research led me to a library, gPhoto2, written for this purpose.
gPhoto2 is an open-source, freely distributable suite of digital camera software designed for Unix-like systems. This comprehensive package is compatible with a broad spectrum of UNIX-like operating environments, encompassing Linux, FreeBSD, NetBSD, MacOS X, and others.
Fortunately, someone had ported gPhoto2 to Raspian “wheezy”. My first order of business was to download and install the library.
I used the following command:
pi@raspberrypi ~ $ sudo apt-get install gphoto2` `The following new packaged were installed (successfully): gphoto2 libcdk5 libexif12 libgd2-xpm libgphoto2-2 libgphoto2-l10n libgphoto2-port0 libltdl71
Once gPhoto2 was installed, I tested to ensure things worked. I plugged my Nikon D40 into the RPi via a mini-USB to USB cable and ran the following command:
pi@raspberrypi ~ $ gphoto2 --auto-detect
Model                          Port
----------------------------------------------------------
Nikon DSC D40 (PTP mode)       usb:001,006
Capturing images
I tested a few commands to set ISO, exposure value (EV) and capture images. However, I needed a way to issue commands to capture five successive images at different exposure values, and I had no way to trigger. After much trial and error, I finally figured out the right combination of gPhoto2 and bash script commands to control the D40 when the camera is turned on.
#this command will set the exposure compensation vale to zero
--set-config /main/capturesettings/exposurecompensation 0

#this commands sets the camera to save images to the SD card
--set-config /main/settings/capturetarget=1

#this command will capture an image
—capture-image

#this command will set the ISO on the D40 to 200
--set-config /main/imgsettings/iso=0
I wanted a script that would wait until the camera was running, take five photos, and then return to waiting. I looked for ways to trigger the script when the camera shutter button was pressed but could not find a way. The best I could do was wait until the camera was turned on, then capture the images and exit.
I used the following code to keep the script waiting until the camera is turned on.
# Wait for camera to be turned on
# by checking USB
DEVICE=$(gphoto2 --auto-detect | grep usb | cut -b 36-42 | sed 's/,///')
while [ -z ${DEVICE} ]
    do
    sleep 1
    DEVICE=$(gphoto2 --auto-detect | grep usb | cut -b 36-42 | sed 's/,///')
done
Once the RPi has detected the camera has been turned on I could initialize the camera and capture images.
echo "Camera has been turned on"
# Configure camera for gphoto2 access and later capture:
# NOTE: I'm not sure this is needed.

gphoto2 --set-config-value /main/capturesettings/exposurecompensation=0
--capture-image-and-download
--filename junk.jpg
--force-overwrite

rm -f junk.jpg

# Assumes camera is in Aperture Priority mode
# Sets ISO to 200 and capture target to SD card
# see config.txt for other options

# Capture 5 images at EV 0,-2,-4,2,4
echo "Capturing five images"
gphoto2 --set-config /main/imgsettings/iso=0
    --set-config /main/settings/capturetarget=1
    --set-config-value /main/capturesettings/exposurecompensation=0
    --capture-image
    --set-config-value /main/capturesettings/exposurecompensation=-2000
    --capture-image
    --set-config-value /main/capturesettings/exposurecompensation=-4000
    --capture-image
    --set-config-value /main/capturesettings/exposurecompensation=2000
    --capture-image
    --set-config-value /main/capturesettings/exposurecompensation=4000
    --capture-image
The script is executed by the pi user crontab every minute. The challenge was that I wanted the script to run, capture five images, and stop until the user was ready to capture another set. Remember, I could not trigger the script with a camera event. But I also wanted to ensure that the script would launch multiple copies of itself within the time it took to capture the images. I set a status flag using a file to indicate when it was already running to the script. I used the useful bits of a script written by Jonathan Franzone
# ------------------------------------------------------------
# Setup Environment
# ------------------------------------------------------------

PDIR=${0%`basename $0`}
LCK_FILE=`basename $0`.lck

# ------------------------------------------------------------
# Am I Running
# ------------------------------------------------------------

if [ -f "${LCK_FILE}" ]; then

    # The file exists so read the PID
    # to see if it is still running
    MYPID=`head -n 1 "${LCK_FILE}"`

    TEST_RUNNING=`ps -p ${MYPID} | grep ${MYPID}`

    if [ -z "${TEST_RUNNING}" ]; then
        # The process is not running
        # Echo current PID into lock file
        echo "Not running"
        echo $ > "${LCK_FILE}"
    else
        echo "`basename $0` is already running [${MYPID}]"
        exit 0
    fi
else
    echo "Not running"
    echo $ > "${LCK_FILE}"
fi
Somewhere in the script, after I’ve captured my images, I could put this.
Putting the thing together3 I have a complete script for capturing five images seconds after the D40 is turned on.
# hdr.sh
#
#
# Created by Khürt L. Williams on 8/21/12.
# Description: Script for executing gPhoto2 commands to record 5 bracketed images
# Portions are from a script written by Jonathan Franzone: http://www.franzone.com/2007/09/23/how-can-i-tell-if-my-bash-script-is-already-running/
# ------------------------------------------------------------
# Setup Environment
# ------------------------------------------------------------
PDIR=${0%`basename $0`}
LCK_FILE=`basename $0`.lck
# ------------------------------------------------------------
# Am I Running
# ------------------------------------------------------------
if [ -f "${LCK_FILE}" ]; then
# The file exists so read the PID
# to see if it is still running
MYPID=`head -n 1 "${LCK_FILE}"`
TEST_RUNNING=`ps -p ${MYPID} | grep ${MYPID}`
if [ -z "${TEST_RUNNING}" ]; then
# The process is not running
# Echo current PID into lock file
echo "Not running"
echo $ > "${LCK_FILE}"
else
echo "`basename $0` is already running [${MYPID}]"
exit 0
fi
else
echo "Not running"
echo $ > "${LCK_FILE}"
fi
# ------------------------------------------------------------
# Image capture
# ------------------------------------------------------------
# Wait for camera to be turned on
# by checking USB
DEVICE=$(gphoto2 --auto-detect | grep usb | cut -b 36-42 | sed 's/,///')
while [ -z ${DEVICE} ]
do
sleep 1
DEVICE=$(gphoto2 --auto-detect | grep usb | cut -b 36-42 | sed 's/,///')
done
echo "Camera has been turned on"
# Configure camera for gphoto2 access and later capture:
# NOTE: I'm not sure this is needed.
gphoto2 --set-config-value /main/capturesettings/exposurecompensation=0
--capture-image-and-download
--filename junk.jpg
--force-overwrite
rm -f junk.jpg
# Assumes camera is in Aperture Priority mode
# Sets ISO to 200 and capture target to SD card
# see config.txt for other options
# Capture 5 images at EV 0,-2,-4,2,4
echo "Capturing five images"
gphoto2 --set-config /main/imgsettings/iso=0
--set-config /main/settings/capturetarget=1
--set-config-value /main/capturesettings/exposurecompensation=0
--capture-image
--set-config-value /main/capturesettings/exposurecompensation=-2000
--capture-image
--set-config-value /main/capturesettings/exposurecompensation=-4000
--capture-image
--set-config-value /main/capturesettings/exposurecompensation=2000
--capture-image
--set-config-value /main/capturesettings/exposurecompensation=4000
--capture-image
# Wait for camera to be turned off
# by checking the USB
DEVICE=$(gphoto2 --auto-detect | grep usb | cut -b 36-42 | sed 's/,///')
while [ ${DEVICE} ]
do
echo "Turn off the camera"
sleep 5
DEVICE=$(gphoto2 --auto-detect | grep usb | cut -b 36-42 | sed 's/,///')
done
# ------------------------------------------------------------
# Cleanup
# ------------------------------------------------------------

rm -f "${LCK_FILE}"
# ------------------------------------------------------------
# Done
# ------------------------------------------------------------
exit 0
Next steps
My solution is useful, but I’m not happy about the script and how the camera operates. Ideally, I would like a way to trigger the captures by detecting the depression of the shutter button on the D40 or via a push button connected to the GPIO on the Raspberry Pi. The script could then be a simple loop that waits for a trigger event, captures five images, and then goes back to waiting.
I also want to encase the Raspberry Pi and cables inside a compact exposure. Currently, a rubber band holds the package together. I ordered the PiBox from Adafruit, which should work nicely. Adafruit has a wide assortment of products designed for the Raspberry Pi.
I’ve budgeted for a lens - Nikkor 35mm f/1.8 and Nikkor 50mm f/1.8 - and a studio lighting kit - AlienBees 800 - but not a new body. ↩
I use Adobe Lightroom plug-ins Photomatix Pro app and HDR Efex Pro app. ↩
You can download the script from my public Dropbox folder. ↩
We use cookies on our website to give you the most relevant experience by remembering your preferences and repeat visits. By clicking “Accept”, you consent to using ALL the cookies. However, this website has no interest in selling your information. It does not explicitly use social media cookies from Facebook, Google, Twitter, Threads, Instagram etc. Read More
This website uses cookies to improve your experience while you navigate through the website. Out of these, the cookies categorized as necessary are stored on your browser as they are essential for the working of basic functionalities of the website. We also use third-party cookies that help us analyze and understand how you use this website. These cookies will be stored in your browser only with your consent. You also have the option to opt out of these cookies. But opting out of some of these cookies may affect your browsing experience.
Necessary cookies are absolutely essential for the website to function properly. These cookies ensure basic functionalities and security features of the website, anonymously.
Cookie
Duration
Description
cookielawinfo-checkbox-analytics
11 months
This cookie is set by GDPR Cookie Consent plugin. The cookie is used to store the user consent for the cookies in the category "Analytics".
cookielawinfo-checkbox-functional
11 months
The cookie is set by GDPR cookie consent to record the user consent for the cookies in the category "Functional".
cookielawinfo-checkbox-necessary
11 months
This cookie is set by GDPR Cookie Consent plugin. The cookies is used to store the user consent for the cookies in the category "Necessary".
cookielawinfo-checkbox-others
11 months
This cookie is set by GDPR Cookie Consent plugin. The cookie is used to store the user consent for the cookies in the category "Other.
cookielawinfo-checkbox-performance
11 months
This cookie is set by GDPR Cookie Consent plugin. The cookie is used to store the user consent for the cookies in the category "Performance".
viewed_cookie_policy
11 months
The cookie is set by the GDPR Cookie Consent plugin and is used to store whether or not user has consented to the use of cookies. It does not store any personal data.
Functional cookies help to perform certain functionalities like sharing the content of the website on social media platforms, collect feedbacks, and other third-party features.
Performance cookies are used to understand and analyze the key performance indexes of the website which helps in delivering a better user experience for the visitors.
Analytical cookies are used to understand how visitors interact with the website. These cookies help provide information on metrics the number of visitors, bounce rate, traffic source, etc.
Advertisement cookies are used to provide visitors with relevant ads and marketing campaigns. These cookies track visitors across websites and collect information to provide customized ads.