How To Setup a Managed Parental Control Account In OS X

The following information is based on OS X 10.10 Yosemite. If you are running an earlier version of OS the information might still useful but you may have to look in different settings.

OS X has four account types – Administrator, Standard, and Managed (with Parental Controls). The Administrator account is the most important.

Managed with Parental Controls: In an account managed by parental controls the administrator can place restrictions on: inappropriate Internet content, the amount of computer use, and access to applications, email, and iChat.

Parental Controls are great for managing how your kids use the Mac. This account can be made more restrictive that the Standard account. Parents can allow use of specific apps, printers, web sites etc. The important distinction between a Standard and Managed account is that the Managed account has restricts on the time, the use of applications and the Internet.

Create a new Managed account

The first step in setting up Parental Controls is to create a new Managed account. You can do this by launching the System Preferences application and then clicking Users & Groups. You will be taken to a preferences pane that looks something like this.

Screenshot 2014-12-30 14.37.19

You may have to click the lock icon in the lower left of the screen to make changes.

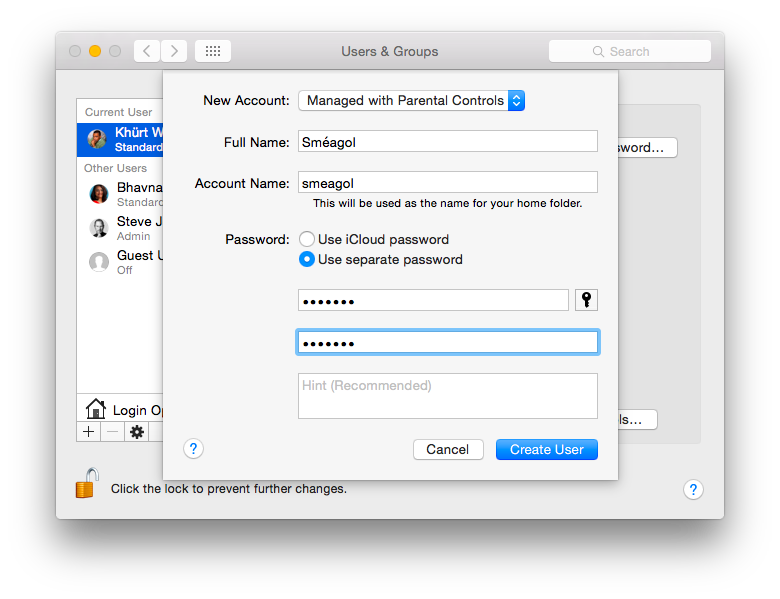
Click the + button in the lower left corner to bring up the new account dialog. Choose Managed with Parental Controls from the drop down and enter a name for the account. Enter a password and make sure to write it down and store it somewhere safe. You will also need to give it to your child.

Local OS X Yosemite accounts can use local passwords for authentication or can be linked to an iCloud account. Once linked, the user can login to the Mac using the same password they user for their iCloud account. If your kids are too young for an email account, skip this step.

Screenshot 2014-12-30 14.38.36

User names like “Khürt Williams” or “Khürt” are helpful but feel free to be creative. If you children are fans of the Lord of the Rings Trilogy, perhaps “Sméagol” is a good choice (Ok, not really).

Click Create User and voilà, you have a new Managed account. To customize the account, clock the image icon and choose and image from the defaults or drag one from your hard drive on to the icon to change it. The next step is to add the Parental Controls to the account.

Parental Controls

It is best to have your kids sit with your while you do this so you can explain why you are making these choices.

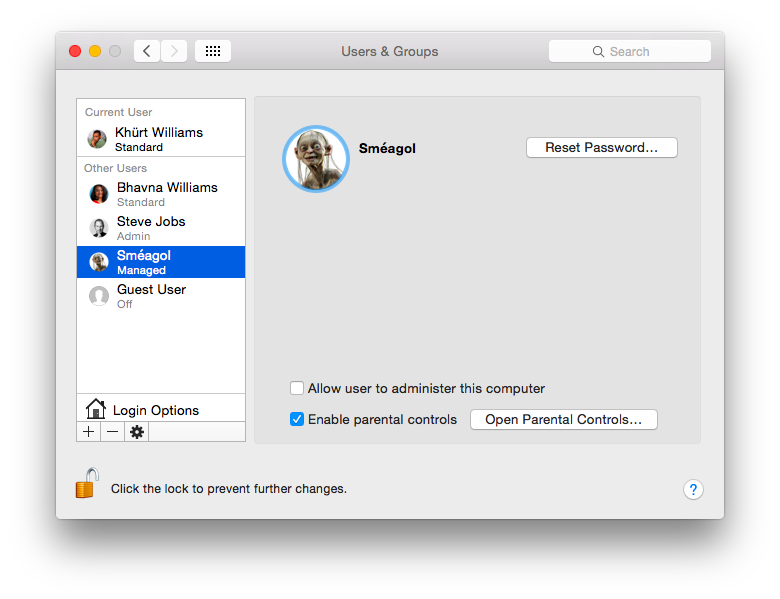
Select the account to be managed and click Open Parental Controls....
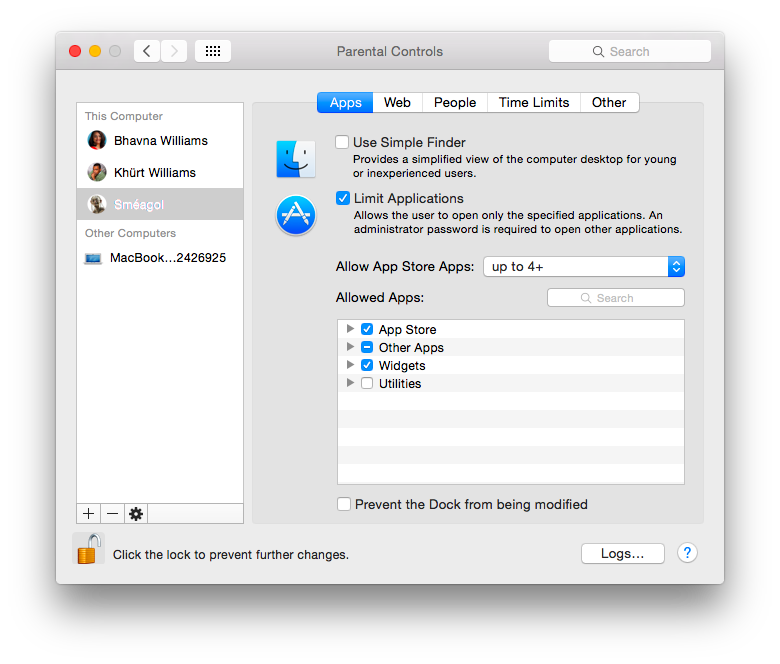
Apps

Apple has provided some pre-configured applications controls based on age groups. For most people these pre-configured controls will do just fine. However, a parent can customize these based on a child maturity level. Click the arrow to show the list of applications and select the ones you want to give your child access to. Your child will be limited to running only those applications that you have explicitly selected.
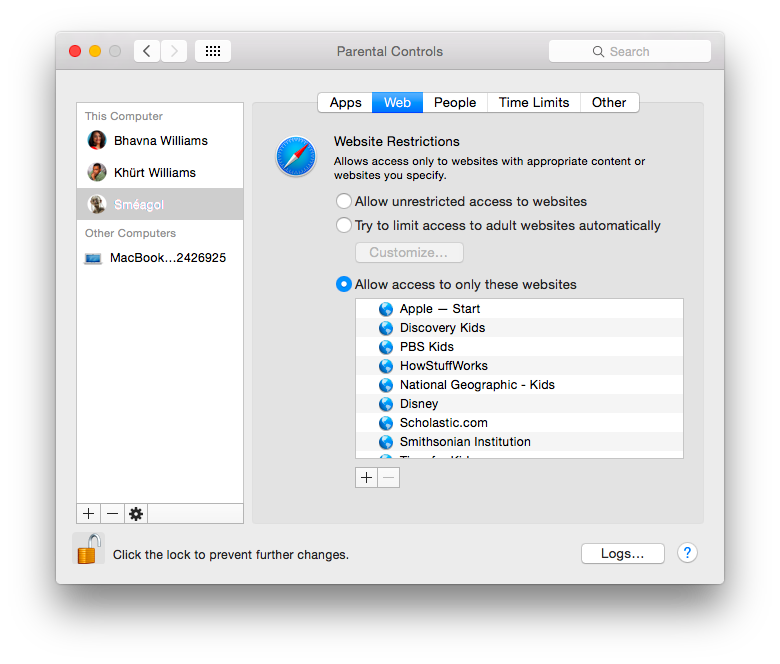
Screenshot 2014-12-30 14.39.26

Web

Parents can select from one of three choices in the Web tab. You can allow unrestricted access to website for older or more mature kids and apply a web filter to keep kids safe from adult web sites. For younger kids, parents can limit access to a specific set of web sites. With that option, children will not be able to visit any web site not explicitly allowed in that list.
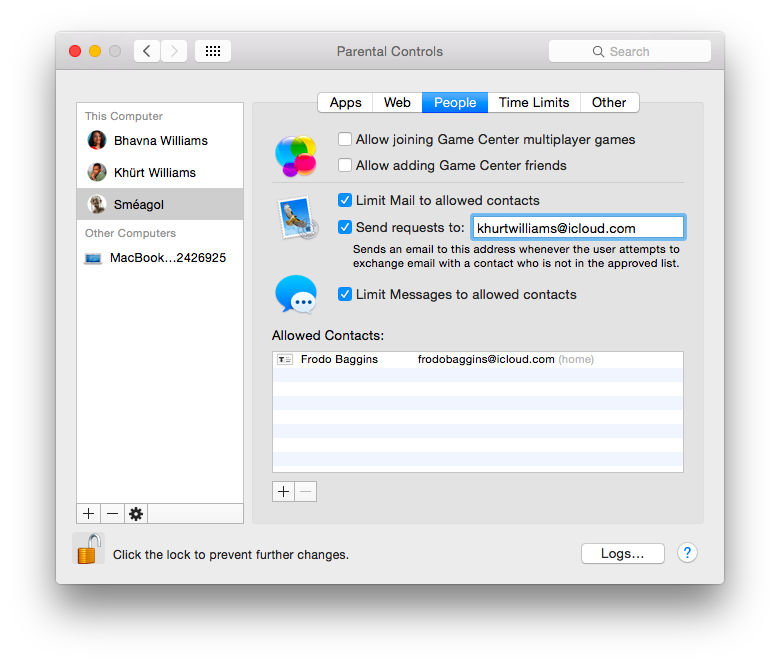
Screenshot 2014-12-30 14.39.34

People

With this tab, a parent can limit a child's contact via email. By adding an email address to this list, OS X will only allow email exchanges between that address and your child email tool. NOTE: This only works with Apple's Mail application so it might be a good idea to prevent access (via the Apps tab) to any other email application and block access to web-based mail.

Screenshot 2014-12-30 14.40.31

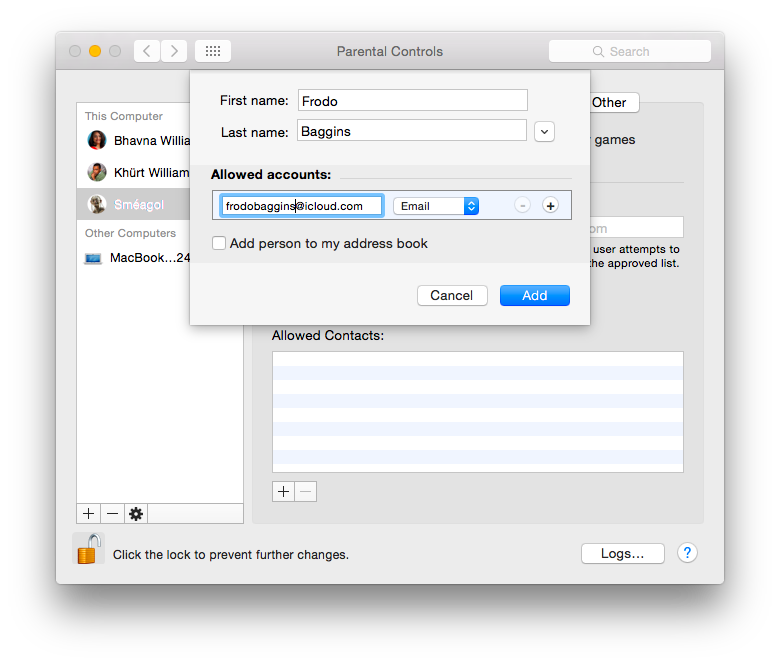
Parents also have the option of receiving an email alert when their child receives or sends email to an unapproved email address.
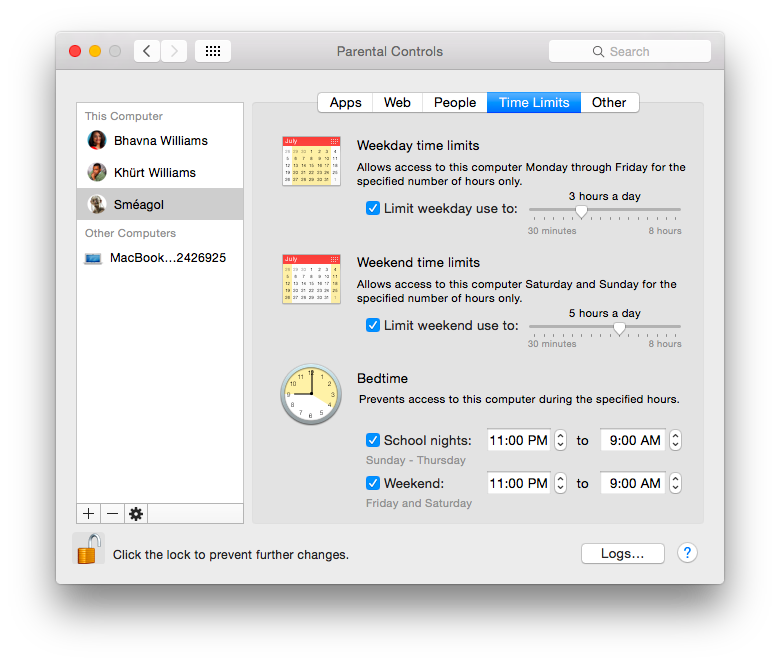
Screenshot 2014-12-30 14.40.57

Time Limits

This is perhaps the most important setting in the Parental Controls preferences. We all know our kids spend too much time online or on the computer. We also know that the older kids needs access to the computer and to the web to complete homework assignments. So as Parents we need to balance homework computer time against hanging out online computer time. This is where you set that up. Spend some time to think about what's right for your family.
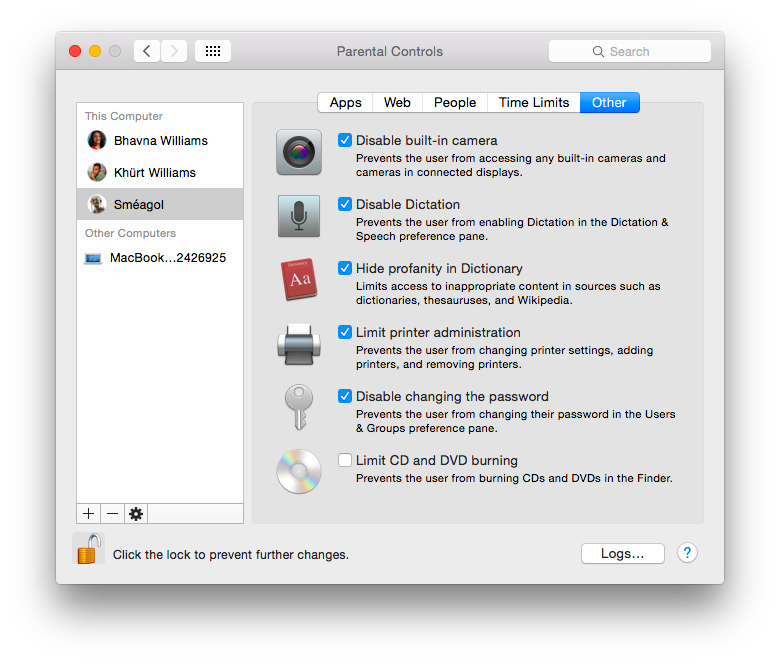
Screenshot 2014-12-30 14.41.11

Other

This one is self-explanatory. Some kids can't be responsible with a webcam, especially teenage kids with a laptop. I don't let my kids change their computer password. I want to be able to see what they are up to. Logs can help with that.
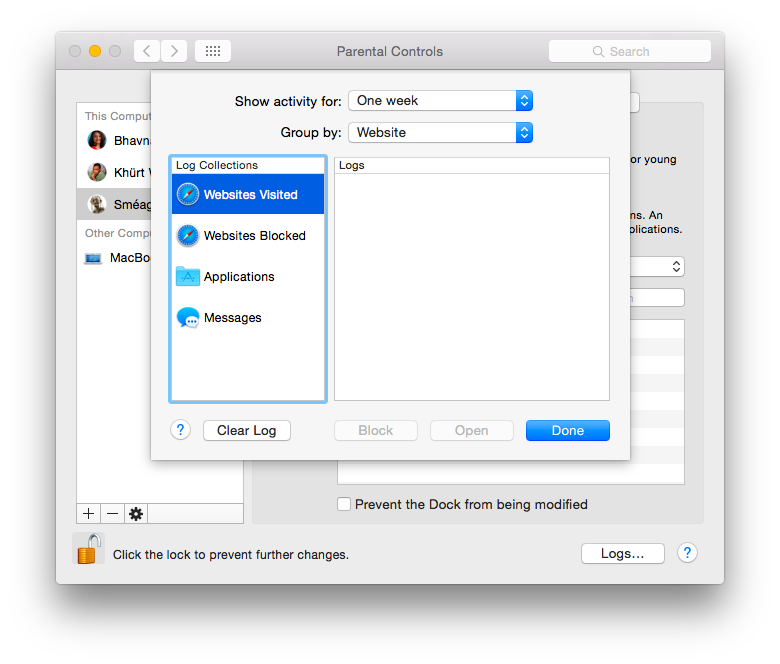
Screenshot 2014-12-30 14.41.27

Logs

I want to be able to see what they are up to. Logs can help with that. OS X will keep a log of every web site your kids successfully visited as well as which ones you blocked but they attempted to visit. You'll know if your young teenage boy has hit puberty by his sudden interest in porn sites. You'll know if your child was using study time to hangout on Facebook or Twitter. Time, date and web site address are recorded in the log.

Screenshot 2014-12-30 14.41.40

Conclusion

In my house computers and the Internet are a privilege, not a right. I teach my kids safe computer and Internet habits but a Managed Account with Parental Controls provides me with a level of comfort that my rules are being followed.

Desk - A writing tool

John Saddington worked on his new OS X publishing app, Desk, for about 250 days. I was priveleged to be invited to test the app for a few months so when it was released in the Mac App Store today, I immediately installed a copy.

John designed Desk to remove the distracting clutter from your mind and help you focus on what matters most: Your thoughts. It’s designed to be simple and intuitive, yet powerful and fast. Desk supports a number of publhsing platforms including:

  • WordPress (self-hosted and .com)
  • Blogger / Blogspot
  • Tumblr
  • Squarespace
  • Movable Type
  • Typepad
  • Facebook Notes

1-Desk-App-Screenshot-Platforms

When you first launch Desk, you'll see how minimal the writing experience is. I was presented with little more than a rectangular window into which I could immediately start writing or drag and drop and image. Desk support both WYSIWYG and Markdown style editing. There is no need to switch between these two choice. Desk uses both of these as the same time.

4-Desk-App-Screenshot-Markdown-WYSIWYG

With Desk I can save a draft locally on my iMac for completion later or store it in iCloud and continue editing from my MacBook Air. iCloud keeps everything in sync and automatically saves my edits.

Most of my blogging is done either via the WordPress web GUI or MarsEdit. While MarsEdit gets the job done the user experience is a bit dated and clunky. In comparison, Desk feels modern and light weight. Feature wise, Desk does everything I can do in MarsEdit.

  • Access, edit, and update existing posts and drafts
  • Drag-and-drop images right into the editor
  • Features for each publishing platform (e.g. Featured images, categories, tags, custom slugs/URLs, etc.)
  • Preview mode with real-time updating

2-Desk-App-Screenshot-Speed

One nifty feature of Desk is that I can chose one platform and configuration as a default. Since WordPress is my main publishing platform and most of my posts are images post, I configured Desk so that publishing is just a single click.

One thing I have been paying attention to recently is the length of my blog posts. In the past some of my post have been long but quite a number are very short; about a sentence or two. While I want to increase the amount of long form content I create I also want to have increase the word count of my image post. I want to write at least 500 word per posts. The Desk editor window displays real-time metadata information such as character count, word count and time to read. Files can be exported as HTML, RTF,PDF and DOCX.

5-Desk-App-Screenshot-Edit-Existing-Posts

John says that Desk is a product that has been more than 10+ years in the making and that he came up with the idea for desk in 2002 while on a road trip down the coast of Florida with his brother. It seems a good idea will persist and persistence can bring ideas to reality.

John-Saddington-2014-Desk-App-1

Visual storytelling with the Storehouse.co App

Storehouse.co is an iOS app and a web publishing platform for creating visual stories. I have used the app only for a short time and published a whopping four stories, but I used it to create my narrative before publishing my stories on this blog. Storehouse.co is to Instagram, as Medium is to Tumblr. Every user gets a profile, and my stories can remain private, or I can publish them to my Storehouse. co profile page. Not only can I create photo journal-type narratives, but I could also lose hours reading the wonderful photo adventures of the many users of the platform.

Tell stories with photos and videos. Whether you're on the iPhone or iPad, creating stories has never been easier or more fun. Seamlessly combine photos, videos, and text into a beautiful story.

The app is the only way to upload videos and images to a story. Once an account is created, you create a story by uploading and laying out photos and videos and entering some descriptive text.

The app has a social media aspect to it. I linked Storehouse to my Instagram, Twitter, and Facebook accounts. Storehouse will then check if any of my followers or people I follow use Storehouse. I can select whom I want to follow from that list or browse through the public feeds for interesting stories to read or people to follow.

Tapping the white circle brings up a story editor. I can import images and videos from the iOS photo library, Instagram, Flickr, or Dropbox or shoot straight from the app. This is easier done on the iPhone. It takes a lot of work to keep the iPad steady while taking a photo.

Once images are imported, I can add text or layout and resize the photos. The image editing interface is simple: tap and drag. A blue outline around a selected image allows the user to crop or reposition the image. Storehouse supports up to 50 photos and videos per story, but videos must be 30 seconds or less. I can pinch to zoom in and out or drag to pan the photo. The images are edited non-destructively. I can undo all my changes. Fonts are limited to Normal, Header, and Quote. The Quote font is the largest and is best used to make a text stand out. Once you have your story how you want it, you can tap the publish button to push it out to the world.

Tapping the little house button brings you to the main feed. From here, you can tap to read a story. It's easy to show appreciation to your fellow Storehouse authors by posting a comment. Once you get to the end of a story, you can tap the call-out icon to post a comment. There is a button for reporting either the story or a rude comment. I've never used the re-blogging feature.

Although both apps contain the complete feature set, the stories and photos are stunning on the larger screen of the iPad Air.