
While working with multiple apps is great sometimes I make the mistake of opening too many. I get lost in the haystack of open windows. There is an easy way to clear the view. Press Option + Command + H and the other apps will be hidden from view.
Tag: Software
How To Make and Receive Phones Call and Texts On Your Mac

The following information is based on OS X 10.10 Yosemite and iOS 8.1. If you are running an earlier version of either OS the information might still useful but you may have to look in different system preferences.
Using your iCloud account, Handoff lets you start something on one device -- e.g., writing and email or using a web site on your iPhone -- and instantly pick up where you left off another devices. The app you need appears in the lock screen, app switcher and Dock on your Mac. Handoff works with your favorite apps like Mail, Safari, Pages, Numbers, Keynote, Maps, Messages, Reminders, Calendar, and Contacts. And clever developers are building Handoff into their apps.
One clever feature of Handoff is the ability to use the cellular features of your iPhone to make and receive phone calls and send and receive SMS messages. Apple calls this feature Continuity. I love this feature.
Quite often when I'm at home using my iMac or reading on my iPad, I'll get a call on my iPhone. Sometimes I may have my iPhone charging or I left it in another room. I don’t want to get up. I don’t want to leave what I’m doing and go get my phone. Voila, with Continuity I see the incoming call on my Mac or iPad. With a flick of the wrist and a click of the mouse I can answer that call. Right on my Mac.
When a call comes in I can see the caller’s name, number, and profile picture. I can even choose ringtones just like on my iPhone. Dude, this is so cool!
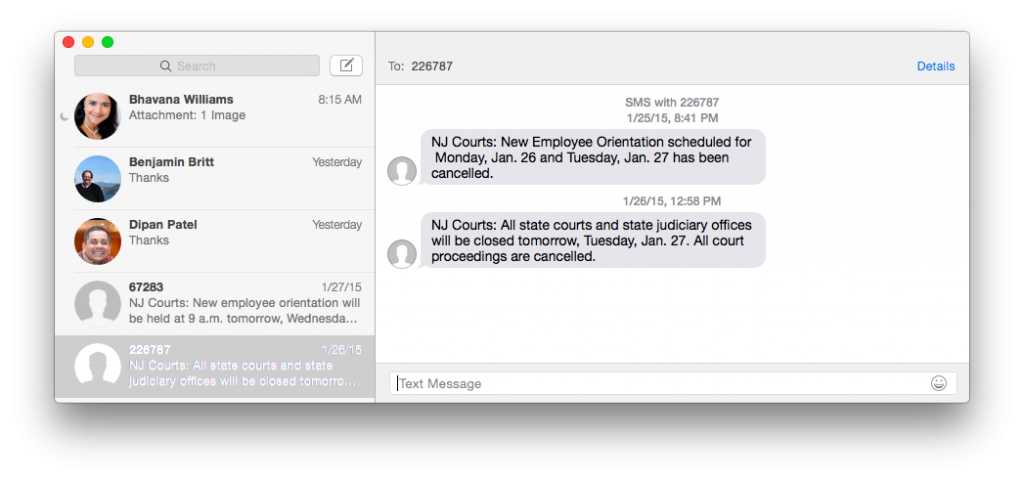
The Continuity feature also works for SMS messages via the Messages app. I send text messages to my friends and family, some of whom have BlackBerries and Android phones, right from my Mac’s keyboard.
Ok, this all sound great, but how do you set it up and use it?
Apple's support site has the official requirements but you'll need a free iCloud account, an iPhone 5 or 6 with an activated carrier plan and running iOS 8.1 and a 2012 (or later) Mac running OS X Yosemite.
For Handoff and Continuity to work your iPhone and your Mac must be connected to the same Wi-Fi network and you will need to enable Bluetooth on each device. On your iPhone and/or iPad, go to Settings-> General-> Handoff & Suggested Apps and make sure Handoff is On. If you’re out of Wi-Fi range, your Mac can connect to your iPhone’s personal hotspot.
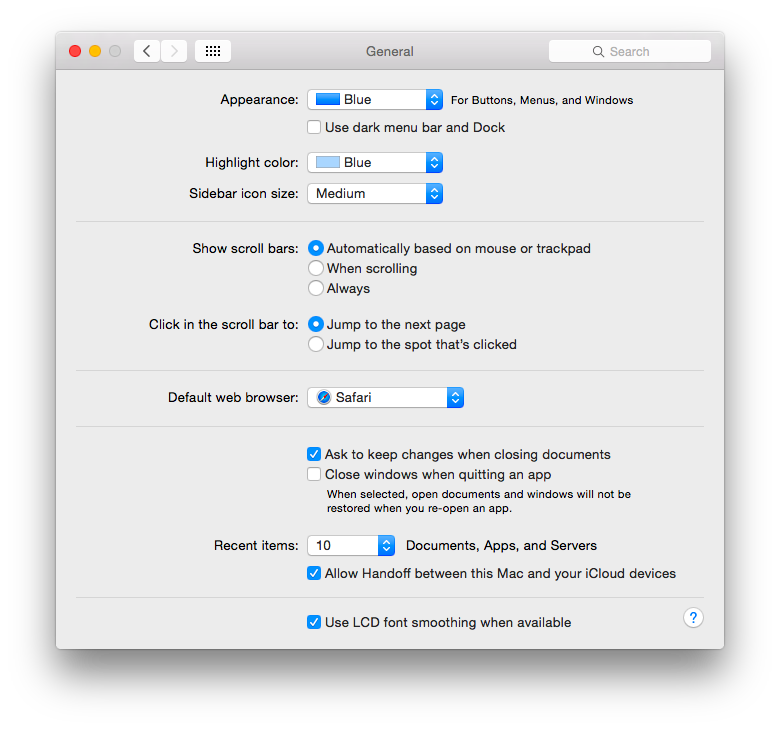
On your Mac, open System Preferences and go to General. Select “Allow Handoff between this Mac and your iCloud devices.” If you don't see this setting, your Mac may not support Handoff.
[fusion_builder_container hundred_percent="yes" overflow="visible"][fusion_builder_row][fusion_builder_column type="1_1" background_position="left top" background_color="" border_size="" border_color="" border_style="solid" spacing="yes" background_image="" background_repeat="no-repeat" padding="" margin_top="0px" margin_bottom="0px" class="" id="" animation_type="" animation_speed="0.3" animation_direction="left" hide_on_mobile="no" center_content="no" min_height="none"]
On your Mac, open the FaceTime app. Go to FaceTime->Preferences and turn on “iPhone Cellular Calls.” You can exit FaceTime once this step is complete.
[/fusion_builder_column][fusion_builder_column type="1_1" background_position="left top" background_color="" border_size="" border_color="" border_style="solid" spacing="yes" background_image="" background_repeat="no-repeat" padding="" margin_top="0px" margin_bottom="0px" class="" id="" animation_type="" animation_speed="0.3" animation_direction="left" hide_on_mobile="no" center_content="no" min_height="none"]
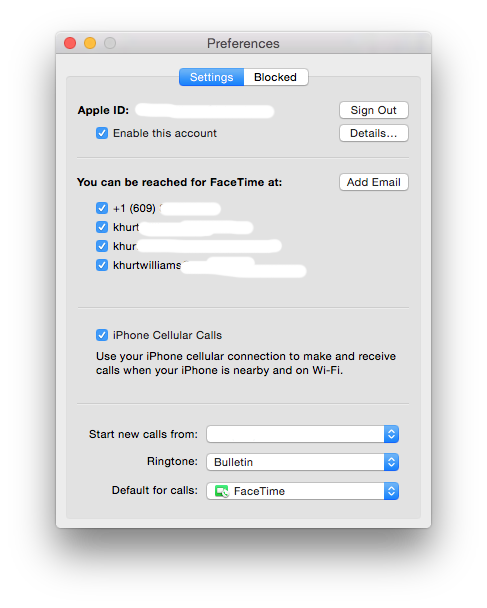
Next, go to System Preferences, and sign out and then sign in again to your iCloud account. I’m not sure why this step is required but things won’t work unless you do this.
[/fusion_builder_column][fusion_builder_column type="1_1" background_position="left top" background_color="" border_size="" border_color="" border_style="solid" spacing="yes" background_image="" background_repeat="no-repeat" padding="" margin_top="0px" margin_bottom="0px" class="" id="" animation_type="" animation_speed="0.3" animation_direction="left" hide_on_mobile="no" center_content="no" min_height="none"]

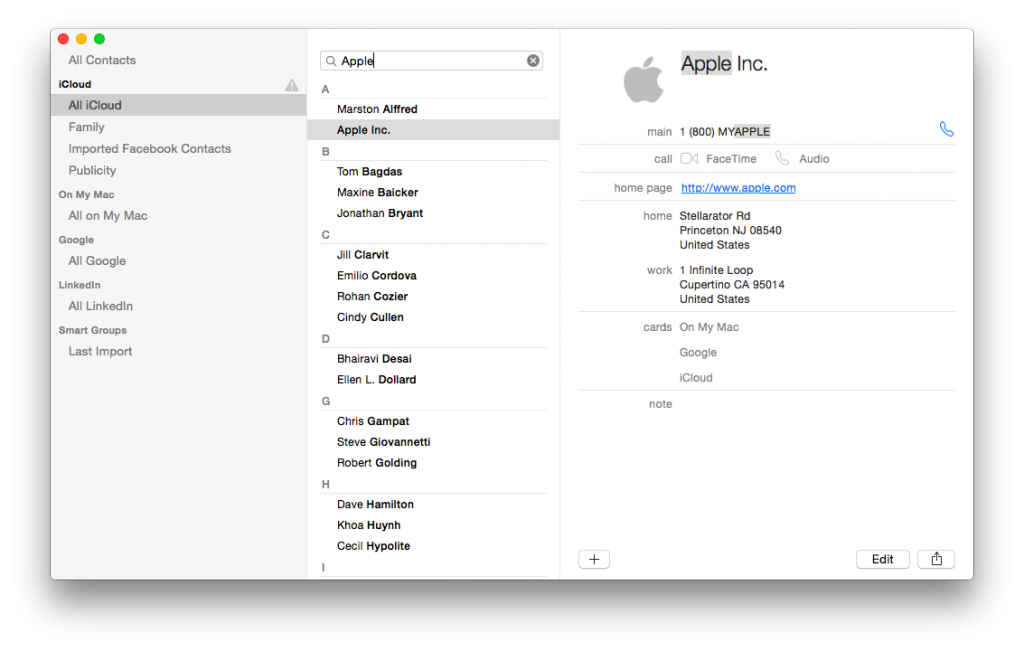
Making calls requires a little more work. You can make calls by selecting a contact from the Contacts app and clicking the little blue telephone icon.
[/fusion_builder_column][fusion_builder_column type="1_1" background_position="left top" background_color="" border_size="" border_color="" border_style="solid" spacing="yes" background_image="" background_repeat="no-repeat" padding="" margin_top="0px" margin_bottom="0px" class="" id="" animation_type="" animation_speed="0.3" animation_direction="left" hide_on_mobile="no" center_content="no" min_height="none"]
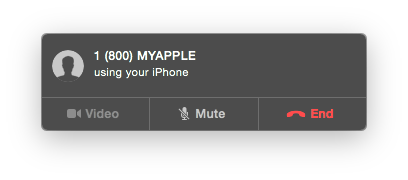
OS X will notify you of the outgoing call with a pop-up.
[/fusion_builder_column][fusion_builder_column type="1_1" background_position="left top" background_color="" border_size="" border_color="" border_style="solid" spacing="yes" background_image="" background_repeat="no-repeat" padding="" margin_top="0px" margin_bottom="0px" class="" id="" animation_type="" animation_speed="0.3" animation_direction="left" hide_on_mobile="no" center_content="no" min_height="none"]
Sending and receiving SMS messages on the Mac is easy. Open the Messages app, type in the recipient's phone number, and start type. It's no different from doing it on your iPhone. You can use emoticons and attach images and video.
[/fusion_builder_column][fusion_builder_column type="1_1" background_position="left top" background_color="" border_size="" border_color="" border_style="solid" spacing="yes" background_image="" background_repeat="no-repeat" padding="" margin_top="0px" margin_bottom="0px" class="" id="" animation_type="" animation_speed="0.3" animation_direction="left" hide_on_mobile="no" center_content="no" min_height="none"]
My iPhone 6 and iCloud have become the hub of my digital communications. Being able to extend the capabilities of my iPhone to my Mac and make and receive phone calls and SMS messages has been a time saver.[/fusion_builder_column][/fusion_builder_row][/fusion_builder_container]
How To Setup System Security & Privacy Settings In OS X

The following information is based on OS X 10.10 Yosemite. If you are running an earlier version of OS the information might still useful but you may have to look in different system preferences.
My friends and family often ask me what they can do to make their Mac more secure. They are often concerned about viruses or people spying on their computer while they are online. No computer can be considered "secure" once it's connected to a network, but a few things you can do now to make using your Mac safer.
Security & Privacy
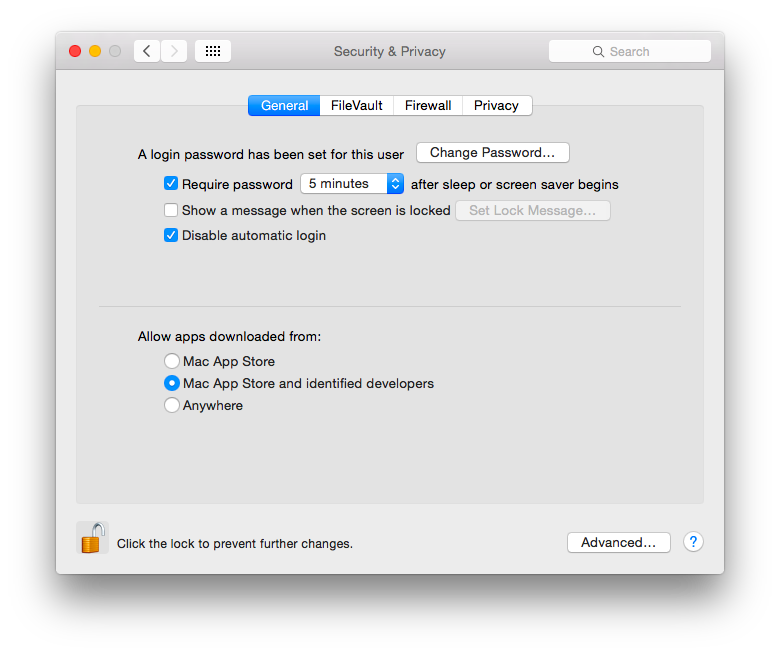
Select Security & Privacy from the System Preferences application.

General
From the General tab you can choose a few items to improve your Mac's security. Having a password on your Mac protects your privacy. But if you walk away and leave your Mac unattended while logged in, anyway with physical access to the Mac can get in and access your files, email etc. To protect my privacy I set my Mac to activate the screen save 5 minutes after the screen saver starts. I then set the screen save to start when my account has been inactive for 10 minutes. With these two settings I am assured that if I walk away from my Mac the account will be automatically locked after 15 minutes of inactivity.
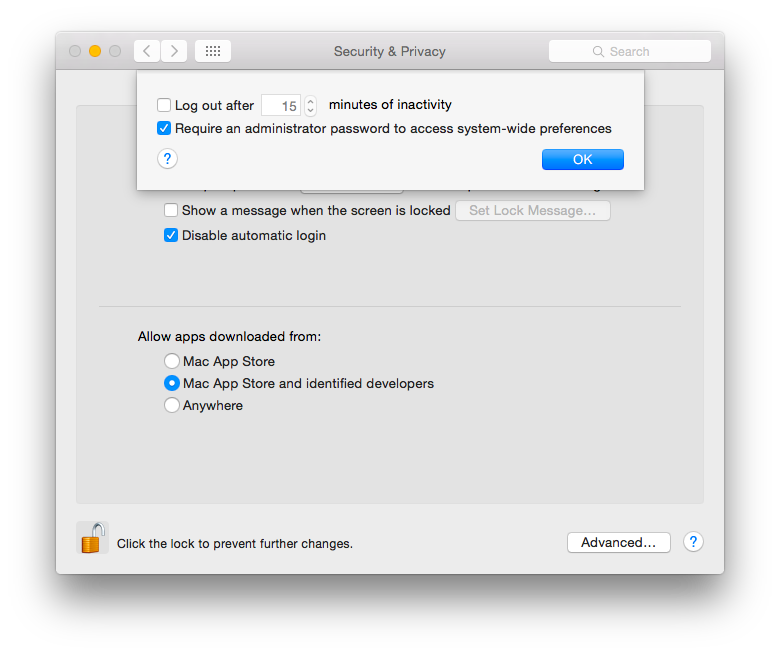
Clicking the Advanced button bring up another set of options. I have set my Mac to require an administrator password to get access to any system preferences. This protect me from myself if for some bizarre reason the Mac gets hit with a virus (rare I know). It also prevents someone who may have access to my Mac from creating new account or changing system preferences to reduce the security of my Mac. If your Mac is a MacBook or in a very public area then you want to logout after a certain amount of account inactivity.
Malicious software can be found all over the net. Users looking for a bargain are often duped into downloading illegal copies of well-known applications such as Microsoft Office. Many times this software has been modified to install key loggers etc. on to you Mac or in the worst case, hold it for ransom. To help protect users Apple has built the App Store around the similar concept at the iTunes App Store. The App Store is more like shopping in a mall as opposed to a flea market. Apple has taken steps to reduce the chance of a malware making it on to your Mac. Apps in the App Store have had security checks, and the developers have been vetted by Apple. Apps in the App Store have also been assigned a security certificate. If Apple later discovers that a particular app or developer has abused security the application can be yanked from the store.
Of course users will want to run third-party apps that are not available in the App Store. You can still do this on your Mac with two level of lowered security expectations. Some developers have chosen to have their apps signed with an Apple certificate. This means that Apple didn't do a security review of the app but did verify that the application is a legitimate application from that particular developer. This is the setting I have chosen. I think it's a good balance between the limited set of apps from the App Store and the flea market of the Internet. The least secure is the Anywhere option that allows you to install whatever you want from anywhere on the Internet. Caveat emptor!
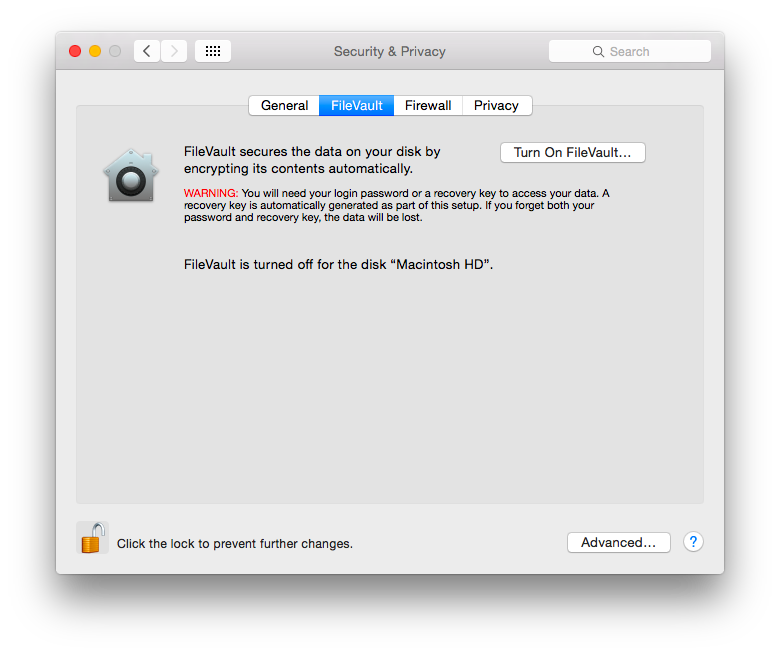
File Vault
Truthfully, I have yet to enable this on any Mac I've owned. OS X will encrypt the entire hard drive and make it unreadable. I think it might be useful for MacBook users who have very sensitive information to protect; things like patient health information or financial records. For the general consumer, they will have to weigh the risks of losing access to their files if they lose the decryption against the risk that someone gets access to their personal information.
Firewall
For the most paranoid or those wanting an extra layer of protecting when connected to Internet hotspots etc., I suggest blocking all incoming connections. You can turn this on an off as needed. For day to day use on a trusted network, I have enabled stealth mode and white listed the application that I want to have Internet access. To add an app or service, click Add, select the item in the list, then use the Up Arrow and Down Arrow keys to set the limits for the app. Stealth mode prevents your Mac from responding to probing requests that can be used to show its existence. The Mac still answers requests from authorized apps, but unauthorized requests such as ICMP (ping) get no response. I have also allowed signed applications to get access to the Internet. This allows apps and services that are signed by a valid certificate authority to be automatically added to the list of allowed apps, without your authorization. For example, iTunes is signed by Apple, so it is automatically allowed to receive incoming connections through the firewall.

Privacy
The privacy settings are used to limit what information about your Mac shares between the applications and services install on your Mac. When you turn on Location Services, you allow apps and websites to use your Mac’s current location to provide information, services, and features appropriate to where you are. For example, when using Facebook I may not want to let Facebook know the location of my computer. System Services allow the location of your Mac to be used by Spotlight or Spotlight Suggestions in Safari. This presence window shows the apps that want access to your contacts, calendars, or reminders. Deselect the app if you want to prevent it from accessing this information. I may want to limit which application have access to my calendar and contact list. I may want to restrict which applications can update Facebook or Twitter.
It's a good idea to spend some time thinking about what information you want to share and what apps have access to this information. Don't rush this one.

Conclusion
Like most computer, the Mac is only as secure as you want it to be. The Internet can be a dangerous place but if you configure a few security settings you can reduce your risk.