Sync Yahoo and Gmail Contacts with Leopard's AddressBook

Both Yahoo and Google provide a method for importing and exporting email addresses to and from OS X AddressBook but I wanted an easier way to keep things synchronized. Fortunately, if you are running OS X 10.5 (Leopard), the AddressBook application provides a straight forward way to do so.

Image representing Google as depicted in Crunc...
Image via CrunchBase

Both Yahoo and Google provide a method for importing and exporting email addresses to and from OS X AddressBook but I wanted an easier way to keep things synchronized. Fortunately, if you are running OS X 10.5 (Leopard), the AddressBook application provides a straight forward way to do so.

Google is special

Like most people I use a web based email service like Yahoo! Mail or Gmail. And like most people I have been using one of these services for quite a long time and I have quite a large number of email addresses that I have saved in the contact list of each of those services, especially Gmail.

Setup

Setup

Gmail account info
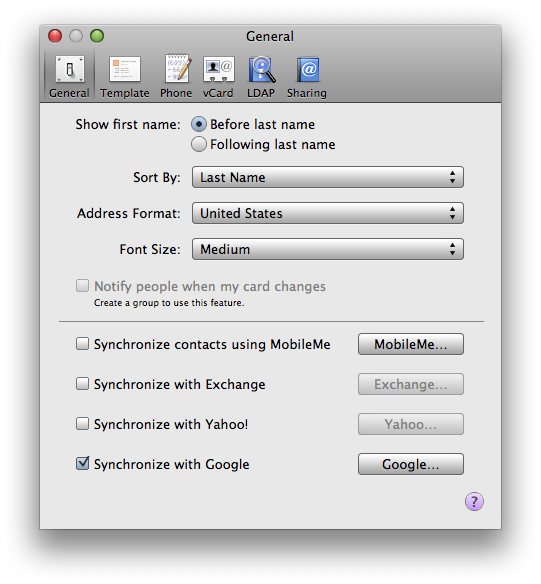
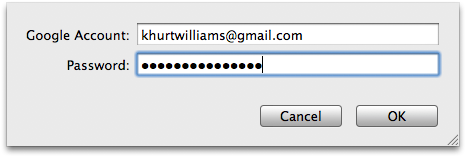
Setup is quick and easy. Go into the Preferences for AddressBook. On the General tab you will see three check boxes for each of the following services: MobileMe, Exchange, Yahoo and Google. You can select all (or none) of these check boxes to enable syncing with each of those services. Google is my preferred service for email so tha's the service I setup. Once you select the checkbox, AddressBook will prompt you for your Gmail username and password. Enter that information and click OK to complete setup. If you have a large AddressBook it could take a while for the sync to complete.

Finish Up

Remote duplicates
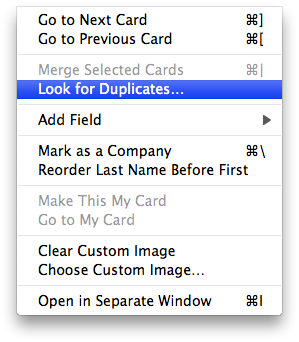
You may already have some contacts in AddressBook that are also in Yahoo or Google and you may find duplicates in your AddressBook once the sync is complete. These are easy to remove. From the AddressBook menu select Card->Look for duplicates. AddressBook will find and merge duplicates entries into just one entry. Any changes or additions to your AddressBook contacts will update your online Google or Yahoo contacts and vice versa.

How to setup OS X's Mail.app to use Gmail

In a previous post I mentioned that I had already configured my Mac to use some of Google's free services and how I felt that this was a cheap way to get some of the same features offered in MobileMe. Namely, I configured Mail.app for use with Gmail, synced my Address Book to my Gmail Contacts, and connected iCal to my Google Calendar. In this post, I explain how to setup Leopard Mail.app for reading Gmail.

IMAP vs POP3

Google provides three ways to access Gmail, their free email service; via the browser, POP3, or IMAP. The Post Office Protocol version 3 (POP3) is a standard protocol used by local e-mail clients to retrieve e-mail from a remote server and download it to the client. IMAP is also a standard protocol for accessing email but unlike POP3 the email stays on the remote server. With POP3 you are limited to reading your email from one location. With IMAP the email stays on the server and you can read it from any computer. IMAP is the method I use to access my Gmail in Mail.app. If I read an email in a web browser then it is marked as read on the server and in Mail.app.

Configuration

Picture 2.pngConfiguring Mail.app to use Gmail is relatively easy. Google has provided excellent instructions on their Gmail Help web site. I have provided my own version here. I think screen shots help in understanding. Launch Mail.app and click Mail->Preferences from the menu bar. Click on the Accounts tab and then click the "+" symbol on the lower left to start the account creation wizard.

Picture 4.png
Enter your name, your Gmail address and password. Be sure to deselect the "Automatically set up account" check box. This check box is enabled by default and automatically creates an entry for POP3 access. We want to setup for IMAP. Now click continue.

Picture 6.png
Click the Account Type drop down and select IMAP. Be sure to change the Incoming Mail Server address to imap.gmail.com. Leave the other fields as they are and click Continue.

Picture 7.png
The next screen is for setting up the Outgoing Mail server information. Other than entering a description, e.g Gmail, you can go ahead and click continue. This will take you to a confirmation summary page. If it all looks correct go ahead and click create. The new account should now appear in the Account column on the left.
Picture 8.png

Tweaks

There are a few small details that will make reading Gmail in Mail.app easier. We will need to change a few things to make Mail.app play nice with Gmail. Google has a number of DO's and DON'Ts that will ensure a smooth experience using Mail.app. Google wants all deleted or sent mail to use the local trash and sent folders. While still in the Accounts tab make sure to deselect all the checkboxes except for "Store draft messages on the server".Picture 9.png

Summary

One of the benefits of using Mail.app with Gmail is that you can now take advantage of all of Mail.app goodness. You can set fonts, colors, backgrounds, and signatures, or one of those interesting templates and pick addresses right from your Address Book. Next post, I'll tell you how to sync your Gmail contact straight with Leopard Address Book.
Picture 10.png

How to protect your Gmail account

Enabling HTTPS in Gmail
Enabling SSL in Gmail

Researchers at the at a Defcon hackers’ conference revealed a flaw in the way Google's Gmail handles session cookies. According to the Hacking Truths. web site:

The problem lies with the fact that every time you access anything on Gmail, even an image, your browser also sends your cookie to the website. This makes it possible for an attacker sniffing traffic on the network to insert an image served from http://mail.google.com and force your browser to send the cookie file, thus getting your session ID.

However, Google does provide a way to prevent that risk.  Login to your Gmail account and click the Settings link in the upper right hand corner of the page.  At the bottom of that page look for the Browser connection section and make sure that Always use https is enabled.