Using journaling in iPhoto for iOS

What excited me most about the Apple press event today was not the 2048x1536 pixel retina display[^1], or the quad-core A5X CPU, or the 5MP digital camera. What excited me was the introduction of [iPhoto](http://www.apple.com/ipad/from-the-app-store/apps-by-apple/iphoto.html). Now iPhoto is not as feature rich as iPhoto for OS X but it gets the jobs done. The feature list is impressive[^2] but the two features that caught my eye are the social sharing features and journaling.

First of all what I've written below is not meant to be a review. I'm sure you'll soon find well written reviews all over the web in a few days. I just want to describe a few features of iPhoto that I am excited about.

#Beam#

I can share to twitter, facebook, and even Flickr[^3]. But the coolest feature is "Beam". I can take a photo with my iPhone 4, edit in iPhoto and then and beam it wireless to my iPad 2.

I turned on the beaming feature of iPhoto on both my iPad and iPhone.

I then selected a photo ( you can select multiple ) and beamed it over to my iPhone. iPhoto automatically detects iOS devices running iPhoto so you can wirelessly beam between your iPad and iPhone over a shared Wi-Fi or Bluetooth connection. Sweet!

#

Journal lets you select a bunch of photos and create a photo collage. You can arrange your photos manually or use of the prebuilt templates. I chose a few of my photos and added a bit of descriptions text, a header and a date widget.

The [resulting Journal](http://www.icloud.com/journal/#p=03&t=CAEQARoQ630BU3KrS6oC9TAnPCeIuw==&f=/82J93X7T25~com~apple~mobileiphoto/Public/536CF79B-0FA9-49AB-ABBC-180F2170B7CC.jb/index.json) can be shared via email or send to iTunes. If you chose email, the recipients get a link to a web site for viewing. One cool and interesting thing I noticed is that I could update the journal later and the changes would be reflected on the web site.

I think the video below does a better job of explaining how it works than any text I can think of tonight.

Using journaling in iPhoto for iOS from Khürt Williams on Vimeo.

[^1]: I love fast hardware too but I'm a software guy.

[^2] :I don't think it's coincidental that Adobe recently released Photoshop Touch for iOS.

[^3]: I have not been as active on Flickr as in the past.

iCloud's PhotoStream

iOS 5 was released this week with a large list of improvements and new features. One new feature that I've come to love immediately — I have used the iOS 5 developer beta — is the PhotoStream feature of the update Photo app. Smartphones have grown in popularity and so along with the resolution and sensitivity of the cameras in those devices. My iPhone 4 has a five megapixel (MP) camera and the newly announced iPhone 4S will have an 8MP camera. When you consider how lightweight and compact smartphones are and that we have them with us everywhere we go, you can understand why many people are neglecting their point-and-shoot digital cameras and instead opting to use the camera apps in their smartphones.

##What is PhotoStream##

PhotoStream is a feature of iCloud and iOS 5 that enabled smartphone photography like never before. With PhotoStream almost every photo I take with my iPhone - there is a 1000 photo limit - are automatically saved to iCloud for up to 30 days. Why is that a big deal? Imagine being on vacation somewhere pleasant and tropical. You've snapped away on your camera for a few days when suddenly the camera warns you that you have exhausted the memory card. Yikes WIth PhotoStream you don't need to worry. You can store 1000 of your most recent photos. You can use the new editing features of the Photo app to make enhancements including red-eye reduction.

What's really cool is that PhotoStream works on both the iPad and the iPhone. That means that my iPad can use (and edit) the photos taken on my iPhone that are save in my PhotoStream. I can use the larger screen of the iPad with more capable apps to make more detailed edits which I can save back to PhotoStream. With PhotoStream, the iPhone and the iPad are partners.

##Enabling PhotoStream##
PhotoStream is enabled from the Settings app on your iPhone, iPod Touch or iPad.

IMG 0015 2
Launch the Settings apps and click the iCloud icon
IMG 0016 2
Now tap the PhotoStream icon.
IMG 0017 1
Make sure the to switch on PhotoStream before exiting the Settings app.

There are quite a few other features of iOS 5 that are enabled by iCloud and PhotoStream is just one of them.

But there's one more thing. An update to iLife make iPhoto work with iCloud. Now image that you've taken hundreds of photos on that vacation using your iPhone. You return from your vacation and launch iPhoto to download your photos from your camera. But, surprise, because your photos have been stored in iCloud, iPhoto automatically downloads them for you. No cables! But that's a different blog post.

How to export to flickr and Facebook using Adobe Photoshop Lightroom 3

Up until recently I've used iPhoto to catalog all my digital photos. I especially like iPhoto '09 when Apple added features to upload photos directly to Facebook and Flickr. I've uploaded hundreds of photos using that feature. But over time I grew tired of the limited photo editing features and wanted something that could let me push my photos to their best.

Lightroom 3 Beta

I've used the Lightroom 3 Beta for a few months and I love it. Lightroom 3 Beta easily pulled in my existing photos from iPhoto and unlike iPhoto '09, Lightroom 3 Beta also won't dump the meta data in my photos. One of the features of Lightroom 3 Beta that I like the most is plug-ins. Plug-ins extend the export functionality of Lightroom 3 Beta. I've been using a couple of Jeffrey Friedl’s Lightroom plug-ins to export my photos to Flickr and Facebook. Jeffrey has plug-ins for many other services, including PicasaWeb, SmugMug and Zenfolio. I'll be detailing the steps to download, install, and use the Facebook plug-in to upload a set of photos.

Download & Install

Head over to the Lightroom Goodies section of Jeffrey Friedl’s blog and download the plug-in that you want to install. For this article we'll be working with the Facebook plug-in. Once you have downloaded the plug-in we need to add it to Lightroom's plug-in manager. Launch Lightroom 3 Beta and click on Plug-In Manager under the File menu to bring up the manager.

Click Add and navigate to the location of the downloaded plug-in. Select the file and click Add. If you have an existing Lightroom catalog you will be prompted to update the catalog. Do it now. If all goes well the plug-in will be added and activated. Click Done.

Screen shot 2010-02-26 at 12.04.11 AM.PNG
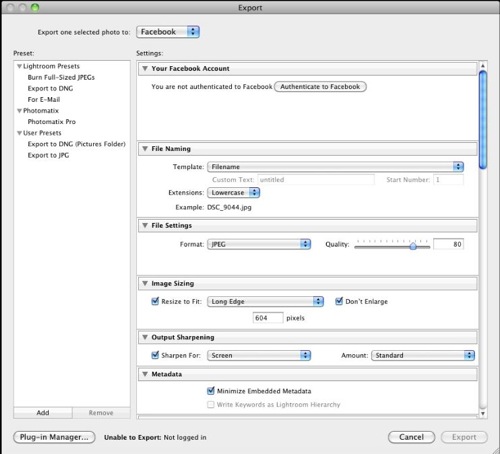
Now we are ready to start using the plug-in. Click a photo or set of photos in your library. Click File->Export from Lightroom Beta 3 and then select Facebook from the export options. Since this is your first time using this plug-in you'll be required to authenticate to Facebook to authorize Lightroom 3 Beta. Lightroom 3 Beta will launch a browser window where you can enter your Facebook username and password.  Login to Facebook and give Lightroom permission to use your Facebook account.  Once that is complete, adjust the other options. Most of the defaults are appropriate.

Create a new Facebook album to save the photos and click Export. Once the export is complete Lightroom Beta 3 will open the facebook album in your default browser.

Many more Lightroom plug-in can be found on Jeffrey's web site as well as the Lightroom Exchange. Experiment, have fun.