As an avid photographer, I'm constantly exploring ways to enhance my craft, especially when using a device as accessible and powerful as the iPhone. In this post, I'll share my refined workflow for post-processing iPhone photographs, leveraging the capabilities of apps like Halide, Adobe Lightroom Classic, and Luminar Neo. I think my approach combines the ease of mobile photography with more involved editing techniques.
Halide has recently become my favourite app for capturing images with my iPhone 11 Pro. The current version, Halide Mark II, offers advanced RAW shooting capabilities, allowing me to capture more detail and dynamic range. Halide provides manual exposure, ISO, focus, and white balance controls, enabling greater post-processing flexibility and higher-quality images than standard HEIC or JPEGs.
Luminar Neo offers AI-driven editing tools, customisable presets, and layer-based adjustments, catering to beginners and professionals for creative and efficient photograph enhancements.
I have used Adobe Lightroom in all its iterations since about 2003. I currently use Adobe Lightroom Classic via the Adobe Creative Cloud Photography subscription. I get access to both Lightroom Classic and Photoshop. Adobe Lightroom Classic is a comprehensive photo editing and cataloguing software. It offers advanced editing tools, colour grading, batch processing, and RAW file support. Key features include non-destructive editing, lens and camera-based corrections, detailed organisation, and robust preset capabilities, catering to professional photographers and photography enthusiasts.

1. Capturing the Perfect Shot with Halide Mark II
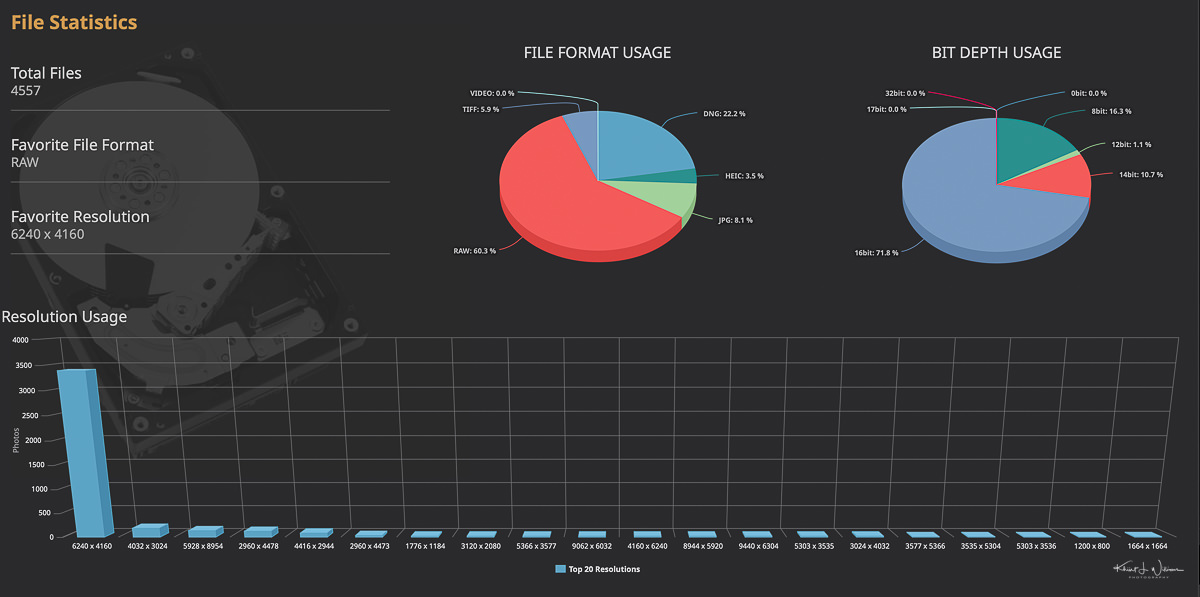
Shoot in RAW1 Format: The Halide Mark II app for iPhone offers robust RAW photography features. RAW images preserve more details, particularly in highlights and shadows, generally display more colour detail, and are sharper than JPEGs. However, can they be grainier in low light or night settings? The first step in my workflow is using Halide Mark II to capture RAW images. In the settings, I can choose between RAW+HEIC, RAW, and HEIC options. HEIC captures a processed file, while RAW+ HEIC captures both a HEIC and a RAW image. I have Halide Mark II set to capture RAW images. Halide Mark II uses the DNG format for RAW. This format retains all the data from the sensor, providing a wide range of possibilities during editing. RAW image capture is also the fastest capture mode in Halide Mark II.

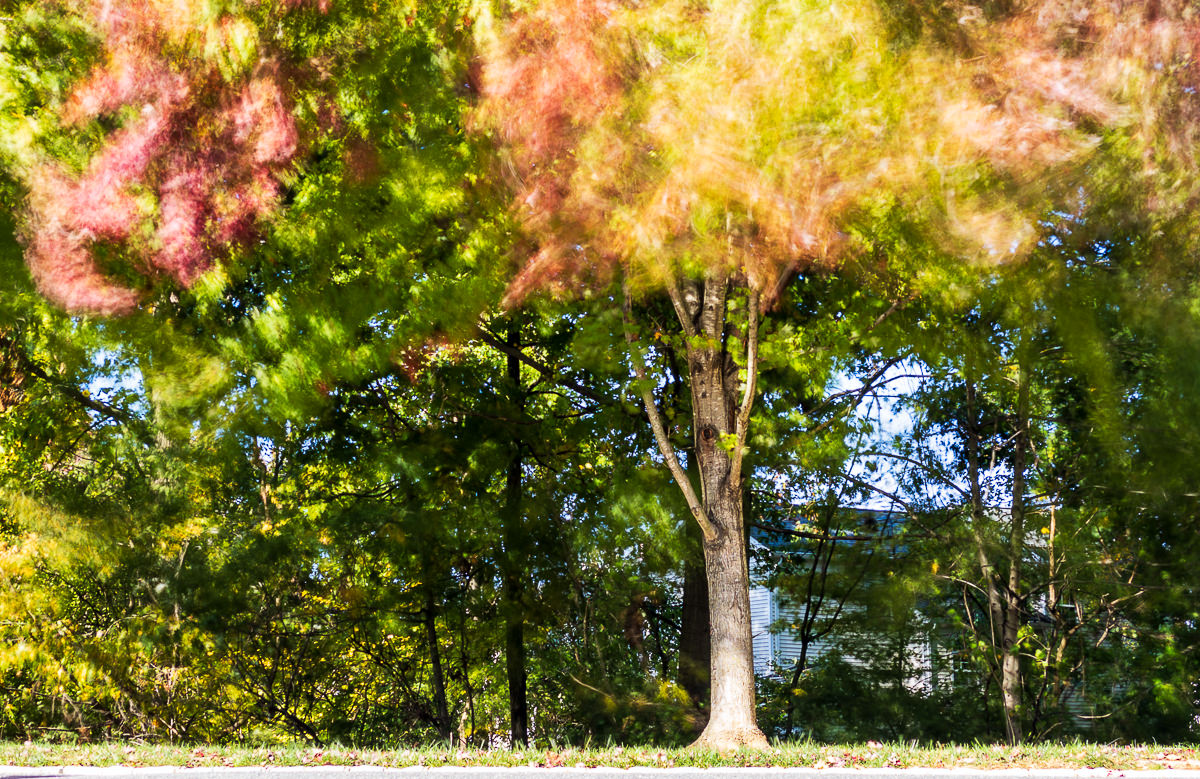
Lens Selection: Depending on the scene, I switch between the 6mm f/2 lens for a tighter frame (great for portraits) and the 4.25mm f/1.8 for wider angles, capturing landscapes or urban settings. The 6mm lens, with its tighter field of view, is perfect for portraits and detailed shots, offering a more focused perspective. The 4.25mm lens, on the other hand, captures more expansive scenes, making it ideal for landscapes and architectural photography. Both lenses provide superb image quality, but I prefer the 6mm f/2 for landscape and cityscape photographs.
Aperture: ƒ/1.8
Exposure Range: 1⁄71000 - 1s
Native ISO Range: 32 - 3072
Focal Length: 4.25mm (26mm FF FOV)
Image Size: 4032 x 3024
Autofocus Systems: Contrast, Phase
Flash: Yes
Aperture: ƒ/2.0
Exposure Range: 1⁄45000 - 1s
Native ISO Range: 21 - 2016
Focal Length: 6mm (51mm FF FOV)
Image Size: 4032 x 3024
Autofocus Systems: Contrast, None, Phase
Flash: Yes
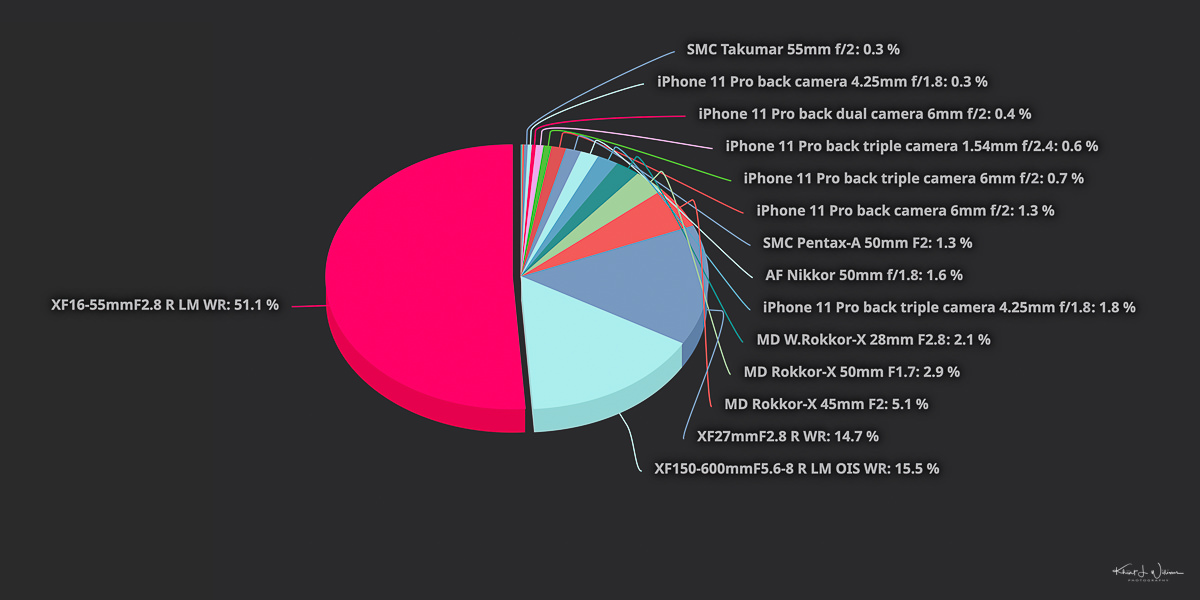
In the Photos app, Apple labels the lenses by their full frame equivalent focal length: Ultra Wide Camera — 13mm ƒ/2.4; Wide Camera — 26mm ƒ/1.8; Telephoto Camera — 52mm ƒ/2. In Adobe Lightroom, Adobe labels the lenses by their native focal length: iPhone 11 Pro back camera 1.54mm f/2.4, iPhone 11 Pro back camera 4.25mm f/1.8, iPhone 11 Pro back camera 6mm f/2.
Apple labels the iPhone 11 Pro lenses by their full-frame equivalent focal length to give users a more familiar reference point, as full-frame measurements are commonly understood in photography. This helps in comparing the field of view with 35mm DSLR cameras. On the other hand, Adobe labels them by their native focal length, which is more technically accurate for the sensor size of the iPhone. This approach precisely measures the lens itself, disregarding sensor size or full-frame equivalency, which aligns more with technical standards in digital imaging.
Low ISO for Reduced Noise: In automatic mode, the Halide Mark II app automatically chooses the optimal combination of ISO and shutter speed. However, there are some tricky situations where you may override those settings. I strive to keep the ISO as low as possible, reducing grain and preserving image quality. The high end of the range is too noisy to produce usable images, even with noise reduction in Adobe Lightroom. Higher ISO settings are reserved for low-light situations where it's unavoidable. I set Halide Mark II to manual mode to adjust the ISO manually.
Manual Mode for Precision: Manual mode has become my go-to in challenging lighting or when I want more creative control over the shot. In Halide Mark II, I use the manual mode to gain control over ISO and shutter speed. To set the ISO, I swipe left or right on the ISO button to adjust the iPhone's sensitivity to light. For the shutter speed, I swipe on the shutter speed button to determine how long the detector is exposed to sunlight. This control is crucial, especially in challenging lighting conditions, as it lets me balance the ISO and shutter speed to achieve the desired exposure, whether capturing fast-moving subjects or shooting in low light, ensuring the best possible image quality.
2. Initial Edits in Adobe Lightroom
Choosing the Right Adobe Profile: Depending on my subject, I select an Adobe profile—Landscape, Neutral, or Portrait—to start the editing process on the right note. Adobe Lightroom profiles apply foundational colour and tone adjustments, offering a starting point for further editing and styling.
Balanced White Balance: Adobe Lightroom's Auto white balance corrects image colours based on lighting conditions for a natural and balanced colour tone. I initially set the white balance to Auto. Then, I make fine adjustments to ensure the colours in my photo are as true to my vision as possible.
Auto Adjustments as a Baseline: Adobe Lightroom's "Auto" tone automatically adjusts exposure, contrast, and other settings for an optimal balance in the image. The Auto setting provides a quick start to adjusting exposure, contrast, and other basics. I then tweak the shadows and highlights to suit my imagination.
Enhance with Noise Reduction: Adobe Lightroom's Denoise AI reduces noise while preserving details, particularly useful in low-light conditions. I use the Raw Details feature if my image is exposed at low ISO. The Raw Details feature enhances the sharpness and clarity of RAW images, allowing for finer control over texture and edge definition, thus significantly improving image quality without adding unwanted artefacts.

Lens Corrections: Adobe Lightroom offers Lens Corrections profiles for the iPhone 11 Pro, automatically compensating for common optical issues like distortion, chromatic aberration, and vignetting. When I import photos taken with the iPhone 11 Pro, Lightroom detects the specific lens used – wide, ultra-wide, or telephoto – and applies tailored corrections based on the lens's characteristics. This feature ensures that images look more natural and appropriate to what the eye sees, improving general image quality. It's useful for architectural and landscape photography, where straight lines and accurate colour rendition are essential.

3. Elevating the Image with Luminar Neo
Applying a Personal Touch: Once I complete all the basic edits, I import the image with the Raw Details enhancements into Luminar Neo. In Luminar Neo, I apply the long exposure preset from the "Easy Landscape Collection". This step is where creativity comes into play, using advanced tools to give the photo a unique character. I usually set the slider to 43% with this preset as a starting point for further changes via the "Edit" menu.
4. The Finishing Touches
Cropping for Composition: The final step often involves cropping the image to enhance its composition, focusing on the subject, or ensuring it adheres to the rule of thirds.
5. Optional Advanced Steps
I sometimes engage in local adjustments. The key is to enhance the image without overdoing it.
Conclusion
This workflow has consistently provided me with high-quality results, balancing iPhone photography's quick and intuitive nature with the depth and precision of experienced post-processing. Whether you're a seasoned photographer or just starting, I hope this guide inspires you to explore the potential of your iPhone camera and bring your creative visions to life.