Your 2013 year in blogging
Island in the Net by Khürt Williams
Technology and Photography Musings. Established circa 2000.
Last year I dumped Instagram and started using Pressgram to publish and share my "in-the-moment" images to Twitter, Facebook and this WordPress blog. I love the feeling that comes from knowing that I have control over how my images are published and licensed. In the past I had to use a WordPress plugin to copy back my Instagram photos my blog. The plug-in worked fine but the quality of the images was terrible. I'm enjoying the quality and ease of using Pressgram to post images to my blog.
While no plug-in is needed to post images from Pressgram to WordPress, developer Joshua Vandercar has written a plug-in that allows a lot of flexibility in how images are posted and presented. The original Pressgram plug-in didn't have these features so Joshua wrote his own. However, the Pressgram team contacted Joshua and they decided to combine efforts. The result is one incredible plug-in for instantly publishing iPhone images to WordPress.
You can install the plug-in directly within the WordPress administrator Plugins panel or download from the WordPress.org site an install manually.
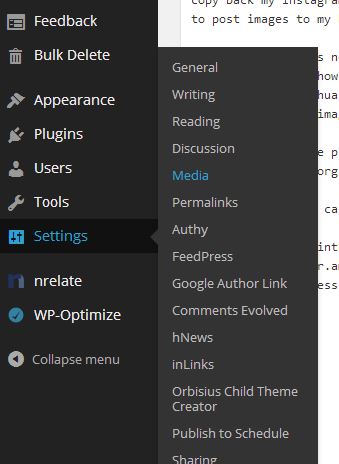
Once installed you can find settings for the Pressgram plug-in under Settings->Media in the WordPress administrator interface. There are a lot of options here so let me walk you through them.

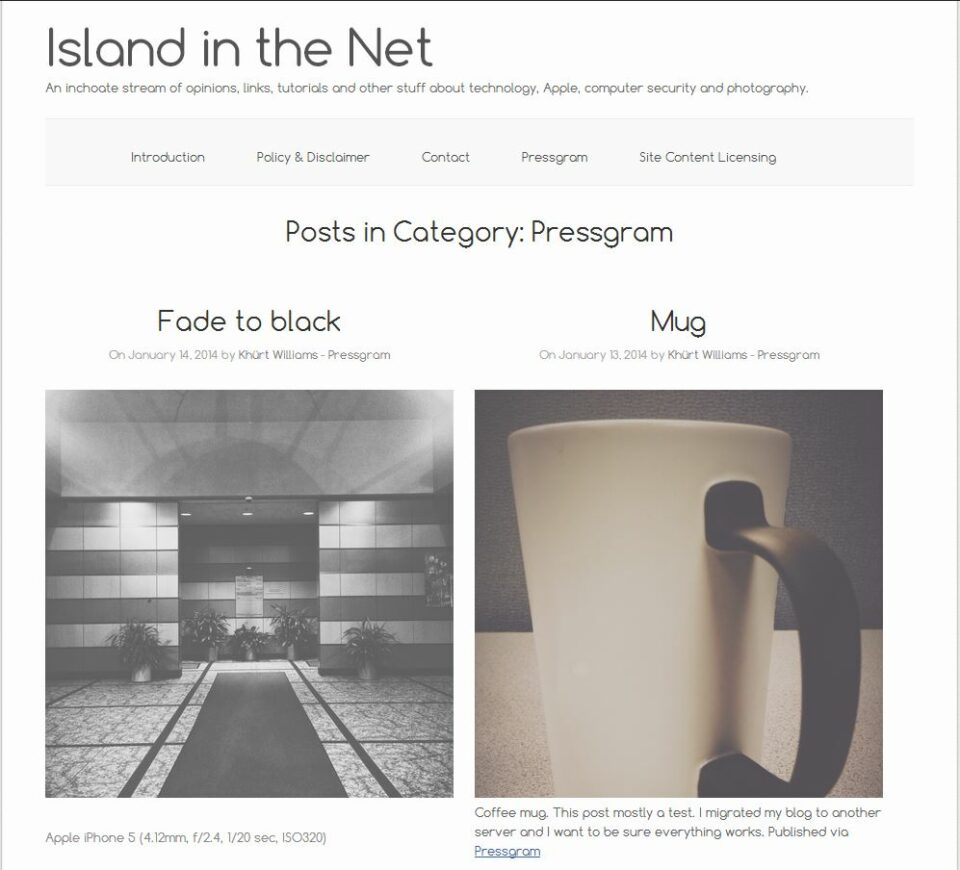
The first thing I did was assign a category for my Pressgram posts. I chose to create a new category called Pressgram but I could have chosen an existing category. I chose a new category so that I could have a category page for my Pressgram posts instead of having my images show up on the home page of my web site. I also opted to have the images show up in my RSS feed.
Once I had a category defined I made some selections to fine tune how images are posted to my blog. I wanted my Pressgram images to be posted immediately as part of a blog post and I wanted the post format to be Image and the image to be centered on the post. Whatever I type into the text box in the Pressgram app -- including hash tags -- will show up in my blog post but I wanted to convert the hash tags to post tags and have them removed from the body of my post.
In the layout section I opted to have my images displayed in two columns across the category page with no more than 10 images per page.
There are a number of other options but I have not used them. You can read more about these on the Pressgram plugin page. As I said before. The Pressgram plugin isn't required to post images from the Pressgram app to your WordPress blog. However, I think the plugin provides more power and flexibility in customizing your blog to maximize your use of Pressgram.
With a single IFTTT recipe and a Flickr Lightroom plugin I show show how to post an image to Wordpress.
Since the launch of Pressgram I have thought a lot about how my photos are published. While Pressgram allows me to snap a photo, add a filter, and post my photo to my WordPress blog1 it doesn't offer an easy way to publish photos I've taken with my DSLR. With Pressgram, I have full creative control over my photos and since the photos are hosted on my blog, I benefit from the traffic to my blog that would otherwise go to a social network.
But as I thought about this some and I realized that for certain photo, photos taken with my DSLR and processed in some other software like Adobe Lightroom, that I would prefer posting these photos to other communities like Flickr or 500px while at the same time driving traffic back to my blog. I could publish my DSLR photos to Pressgram but I felt that I was better served publishing them into a more appropriate community. The communities on 500px and Flickr are more geared toward the DSLR and compact systems camera (CSC) photographer2. I have accounts on both but recently have leaned toward using 500px more.
A few years ago, I settled on using Adobe Lightroom for cataloging and editing my photos. The "good" ones the ones I feel comfortable sharing publicly, end up on my blog. My current workflow for publishing photos involves exporting a suitably sized photo to a local folder, optionally optimizing the photo using JPEGmini, then uploading and posting to my blog3. JPEGmini helps improve the performance of my photo heavy blog. Occasionally I remember to upload them to 500px via a 500px export plugin for Lightroom.
Here's the current "publish" workflow.
It's not a complicated workflow but it seemed to me that there was room for improvement. When I export photos to 500px, I can set certain parameters for quality of the photo including sizing and JPEG compression. What if I could skip the JPEGmini optimization step and use the 500px optimized photo on my blog? My photos would be hosted at 500px and I would benefit from improved performance on my site since photos would be served from 500px servers instead of mine.
What I wanted was to post my photos to 500px, along with some text, while at the same time creating a blog post. Basically I wanted a Pressgram style workflow for my DSLR photos.
I had messed around with IFTTT, a service that lets anyone create connections between various online services (channels). I could create a recipe to connect 500px and WordPress. Each upload to 500px would trigger the recipe to create a blog entry. Posting my photos to 500px and WordPress would be as simple as using the 500px Lightroom plugin. My recipe requires that the photo is tagged with keyword "wordpress". This allows me the flexibility of sometimes publishing to 500px without also creating a blog post.
Here's the new "publish" workflow.
When the IFTTT recipe is triggered, my content and photo will post to WordPress. Since I use Markdown to create my blog post the 500px text will appear formatted in Markdown. This isn't much of a problem since most of my photos post don't include links and Markdown text is easy to read. A plugin on my WordPress blog converts the Markdown to HTML. The blog posting will also include a small piece of text with a link back to my 500px photo.
I used this workflow on two recent blog posts. One about my early morning trip to Rojo's Roastery and the other about scratching my food photography itch.
There is one downside to this. My photos will be hosted on 500px. I am will be subject to 500px TOS and if I close my 500px account or delete a photo from 500px, the photo links on my blog will break. However, I think 500px's TOS is designed to favour the rights of the photographer. 500px keeps adding new features most of which benefit me as a photographer. I especially love the portfolio feature and I can mark my photos for sale.
This modified workflow will work with Flickr. Adobe has a built-in Flickr4 export plugin and it's easy to create a workable IFTTT recipe.