vividHDR

I love HDR photography. In case you don't know what that is you can head over to Trey Ratcliff's website for an explanation. Here's my quick version. In HDR photography, the photographers take at least two (three or more is better) exposure bracketed and through the magic of software, algorithms combine them into a single image. As you can tell from Trey's photos, the results can produce a striking increase in dynamic range.

I capture most of my images for HDR work on my Nikon. However, setting up a tripod, DSLR and wide-angle lens while stopped at the side of a narrow country road with cars whizzing by is a less than ideal experience. Sometimes my iPhone is the most convenient camera I have with me. I've experimented with various HDR apps for the iPhone over the last few years, but I always found them lacking in some aspect. I've installed and deleted about half a dozen HDR apps from my iPhone. vividHDR is the first HDR app that has a chance of remaining on my iPhone long-term.

vividHDR is a simple app. This simplicity is one of the reasons I like it. Most HDR app overwhelms me with a million pre and post-processing option. Contrast that with vividHR, which launches right into a camera-ready mode.

Tapping the icon on the bottom left of the screen brings up several HDR presets. When I started writing this review, the app only had three, but a recent update raised that number to five. It doesn't matter which one you chose upfront since you can switch between presets after the HDR is created.

1387833611.jpg

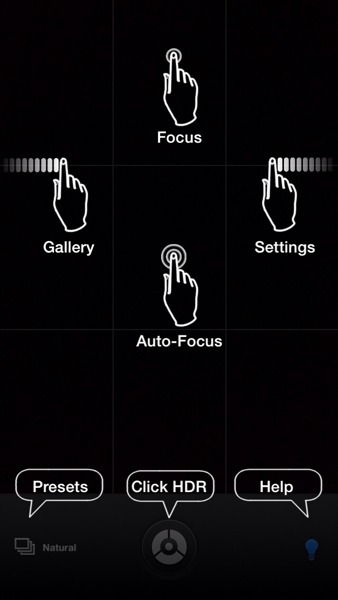
Tapping the lightbulb in the lower right corner overlays icons indicating how to use the app.

1387833703.jpg

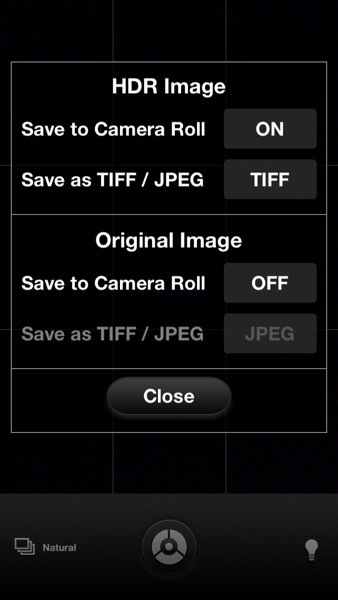
Swiping to the right reveals a vertical menu. From here you can toggle on/off geotag, overlay grid, auto-preview, select and setup sharing options, and how you want to save the original and HDR images.

1387833799.jpg

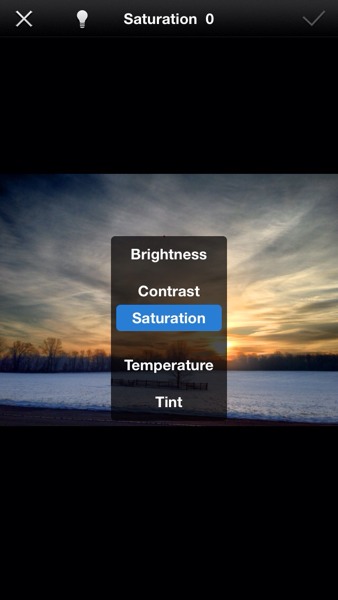
Swiping to the right will let you swipe through each image in the photo gallery. You'll get another set of menus on the bottom of the screen. You can compare the original photo to its HDR version or share the HDR image, make editing changes or delete the photo. I've never used the image editor. I usually stick with the results from the presets. If I do want to make an edit I prefer using another app like Photogene4.
1387833962.jpg

Tapping the i in the upper left-hand corner will bring up some meta-information about your HDR image.

I like the fact that vividHDR has its own internal gallery/lightbox and saves images exported to the Photos app to its album. The iOS Photos app can get so cluttered and sometimes I have difficulty finding the photo I want. Whether I am snapping a picture to post to [Pressgram ][http://pressgr.am\]or upload to a blog posing using Poster, being able to navigate to an album with just the images I need makes things simpler.

Although the app is simple to use, taking a good quality HDR image requires some patience. The app has to take three photos and merge them. Neither the camera nor the subject must move or change while the images are being captured. Although the app can be used handheld, I recommend bracing yourself against something -- a tree, a pole -- to reduce movement. For the photo below I leaned against my car to get the shot. Or maybe you can keep a mini tripod and iPhone mount such as the Glif in your glove box.

Sunrise, Princeton, Battlefield Park, Winter, Snow

Sunrise over Princeton Battlefield Park

[exif id="11726"]

This image was taken yesterday. In the morning. On the way to work. I pulled over to the side of the road and waited for a pause in the rush hour traffic on Princeton Pike.

Captured with vividHDR on an iPhone 5. Minor edits in Photogene4.

How I Edit & Publish to Pressgram Workflow

I've never had a set workflow for my iPhone photography. I've may photography related apps -- cameras, filters, editors, etc -- that I use without thinking much about efficiency or workflow. Often times I can't remember how I created a particular image. Inspired by a [recent blog post] by Jorge Quinteros I decided to develop one for my new favorite photography app Pressgram.

image of flower

I use one of several apps for capturing my images but I use the native Camera app, Camera+, and viviHDR often. I use the native Camera app when I want quick access to my iPhone camera. It can be launched from the lock screen very easily, has a square1 mode and some ok filters. I don't use the HDR feature of the iOS Camera app. I think viviHDR does a better job and has three HDR modes. VSCOcam, Camera+ and Afterlight have excellent filters and shooting modes absent from the native app. Camera+ has image stabilization, a timer, and a burst shooting mode. Afterlight has an overwhelming number of features. I'm not going to catalog them all. Finally VSCOcam. I use this app mostly for the large number of analog film inspired filters. Camera+, vividHDR, and VSCOcam all have lightboxes. This is handy if I want to create multiple edits of my images before exporting to the iPhone's Camera Roll.

Photogene is another app for filtering and editing my photos. I know it has an overwhelming number of features but I expect that soon I will reduce the number of apps I use because it does so much. I'm using it mostly for the healing tool. My iPhone 5 camera has a scratch near the center. It's quite noticeable in shots with a clear background on portraits. I can easily remove that blemish from my images.

Once I'm happy with my edits I export my images to the Camera Roll and maybe import into EXIF-Fi. EXIF-fi is an app for editing the information stored inside the image file. I use it to add some copyright and descriptive text to my images. While I don't care if someone downloads and uses my images (non-commercial) I do want my Creative Commons copyright respected.

Unfortunately iOS does not have a file system. Each time I edit and export an image a new copy is created. This can make keeping track of which file contains my edits. Fortunately some of these apps -- VSCOcam, Exif-Fi, -- create app specific folders within the Photos app. I use these folders to keep track of which image contains my edits. It's not perfect but it's what I've got.

From the camera roll or app specific folder, I import my image into Pressgram, select my blog from the list, add some descriptive text (with hashtags), a title and some categories and hit the check mark to publish my image to my blog and Pressgram.

That's my workflow in a nutshell. My workflow isn't strictly defined; it's just a guideline I follow. The reason I have so many apps is that I find that no single app has a filter that always works to give my images the look I want. I experiment a bit. It could take me up to five minutes to create something I like.

While in the past I was quick to capture, filter and post I think I may want to change to a new strategy. I' leaning towards capturing images during the day and the doing my edits and posts later in the day. This will give me more time to think about how I want the images to look.

painted flower


  1. I'm using the iOS 7 camera app.