One Photo Focus October

Stacy P. Fischer is the host of the After Before Forum’s One Photo Focus challenge. The One Photo Focus challenge idea is simple. On the first Friday of the month, a photo is contributed by a member of the After Before Forum. Participants have the first Friday of the month to edit the image any way they like. The edited image is then submitted back to Stacy where the participants and others can view what was done.

For the October challenge, Y. Prior has submitted a smartphone image. The JPEG image was shot on an iPhone 6 at high ISO. The iPhone 6 camera performs well in brightly lit conditions but doesn’t do as well in darker conditions. The image has a lot of noise and loss of detail in the shadows. I knew this was going to be a challenge given that the image is a JPEG.

[fusion_builder_container hundred_percent="yes" overflow="visible"][fusion_builder_row][fusion_builder_column type="1_1" background_position="left top" background_color="" border_size="" border_color="" border_style="solid" spacing="yes" background_image="" background_repeat="no-repeat" padding="" margin_top="0px" margin_bottom="0px" class="" id="" animation_type="" animation_speed="0.3" animation_direction="left" hide_on_mobile="no" center_content="no" min_height="none"]

Original photograph by Y. Prior; Edited by Khürt Williams
Original photograph by Y. Prior
[/fusion_builder_column][fusion_builder_column type="1_1" background_position="left top" background_color="" border_size="" border_color="" border_style="solid" spacing="yes" background_image="" background_repeat="no-repeat" padding="" margin_top="0px" margin_bottom="0px" class="" id="" animation_type="" animation_speed="0.3" animation_direction="left" hide_on_mobile="no" center_content="no" min_height="none"][exif id="22802"]

I pulled the image into Adobe and tried a few things. But first I converted the JPEG image to DNG. JPEG tends to lose quality when multiple edits are applied to the image. JPEG uses lossy compression so every time the image is saved the algorithm compresses it and you lose detail. Converting to DNG assured me that all edits were being applied without loss of image detail.

I considered that I could simply apply a filter and call it a day. But instead, I decided to try doing a fake HDR. After applying profile correction, I created ten virtual copies of the image, created a bracketed set of images, -5/+5,-4/+4,-3/+3,-2/+2,-1/+1, and combined them in Photomatix Pro with the Natural preset.

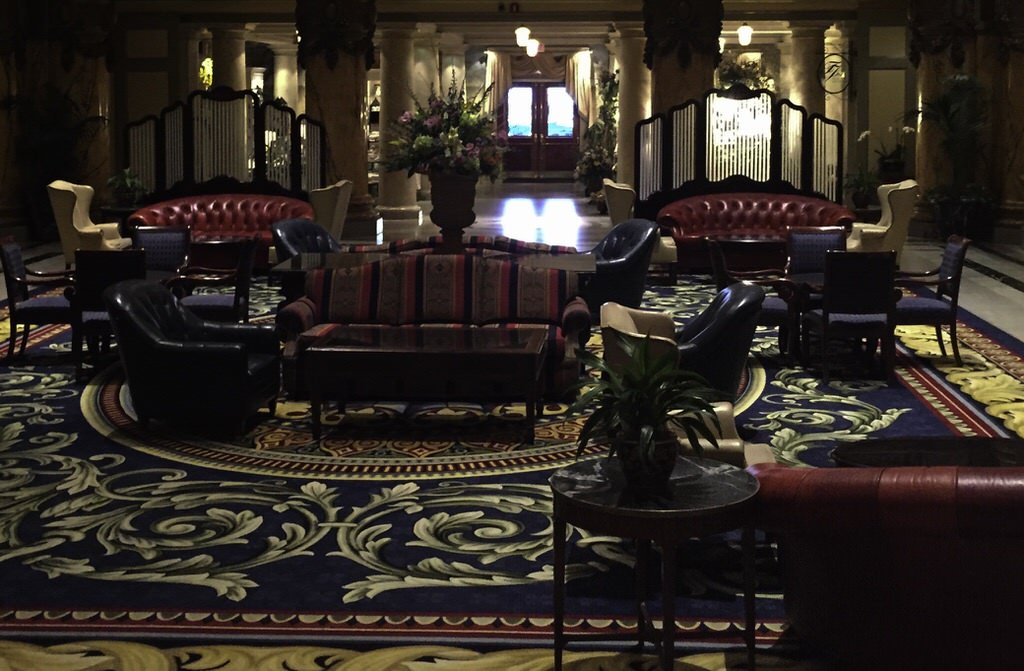
I then cropped the image to make the composition cosier. The leather and the room decor suggested musty old hotel lobby to me. I wanted to create a cosier, a warmer feeling so I adjusted the exposure to -1.33 in an attempt to enhance that feeling. I think this composition has more of a country club feeling.

I used Nik’s Dfine plug-in to reduce the noise in the shadows.

Original photograph by Y. Prior; Edited by Khürt Williams

Once I had wrapped that up it occurred to me that I should try editing the image on my iPad or iPhone. The original image was shot on an iPhone, why not do all my editing on my iPhone? I exported the cropped copy of the original image to TIF and copied it over to my iPhone for editing in my favourite iOS image editor, Polarr.

Polarr is a photo editor aimed at a more advanced user demographic than Instagram or VSCOcam. Polarr allows the user to make similar adjustments to what one would find in Adobe Lightroom — white balance, exposure, contrast, clarity, highlights and shadows, HSL channels, curves, vignettes, distortions, watermarks and more. It also includes a set of filter presets to use a starting point for your edits. Polarr is available via a web browser but there are apps for iOS, Android, Windows, Linux and macOS.

In Polarr, I cropped the original and adjusted contrast, exposure, saturation, noise, vibrancy, etc. to create the image below which I submitted to Stacy. What do you think?

One Photo Focus
Original photograph by Y. Prior; Edited by Khürt Williams
[/fusion_builder_column][/fusion_builder_row][/fusion_builder_container]

One Photo Focus September

This weekend, while stumbling through the “Reader” section of the WordPress iO app, I discovered the After Before Forum and the One Photo Focus challenge.

The “After Before Forum” was the brainchild of Stacy P. Fischer who had been hosting a regular photo challenge on her blog, Visual Venturing. Currently the “After Before Forum” is hosted by Benjamin Rowe on Aperture64.

Stacy is now the host of the One Photo Focus challenge. The One Photo Focus challenge idea is simple. On the first Friday of the month, a photo is contributed by a member of the After Before Forum. Participants have one the first Friday of the month to edit the image any way they like. The edited image is then submitted back to Stacy where the participants and others can view what was done.

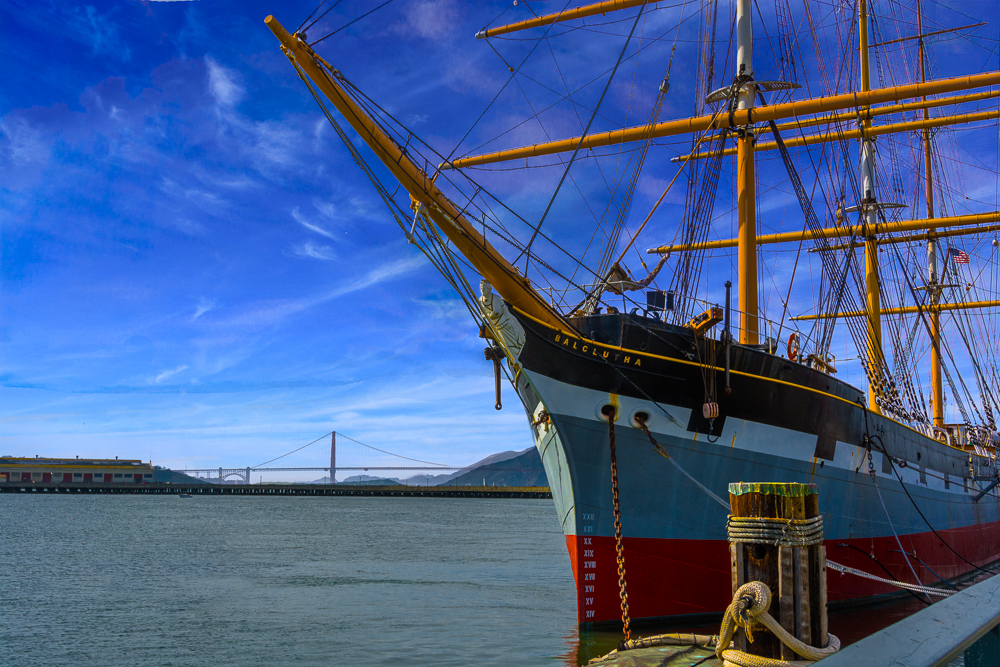
This seemed like it would be fun so I contacted Stacy about my participation. She was happy to send me a link to the NEF and JPG files( Stacy’s a Nikon shooter). September's challenge is the image below.

[fusion_builder_container hundred_percent="yes" overflow="visible"][fusion_builder_row][fusion_builder_column type="1_1" background_position="left top" background_color="" border_size="" border_color="" border_style="solid" spacing="yes" background_image="" background_repeat="no-repeat" padding="" margin_top="0px" margin_bottom="0px" class="" id="" animation_type="" animation_speed="0.3" animation_direction="left" hide_on_mobile="no" center_content="no" min_height="none"]

NIKON_CORPORATION-NIKON_D7100-20141023-
Original image Stacy Fischer
My original thought was that I could replace the cloudy sky with something more dramatic. I wanted to layer in a background of a large moon or moons and space rock to give a feeling this ship was docked on an alien ocean. But I could not find a suitable background so I opted for a simpler replacement with a bluer and less cloudy sky. The background image is by Matthew Kosloski who released it as a Creative Common Zero (CC0) image on Unsplash. I removed the buoy and rope and applied a personal preset to adjust the shadows, highlights, and contrast. I also got to use Photoshops' Background Eraser Tool for the first time. I used a tutorial I found on the PhotoShop Essentials website. The result is the image you see in the featured image section of this post.

I didn’t accomplish what I wanted but I am happy with the image I produced given the limited time I had. I started the challenge late with only four days to make my changes.[/fusion_builder_column][/fusion_builder_row][/fusion_builder_container]