Capture
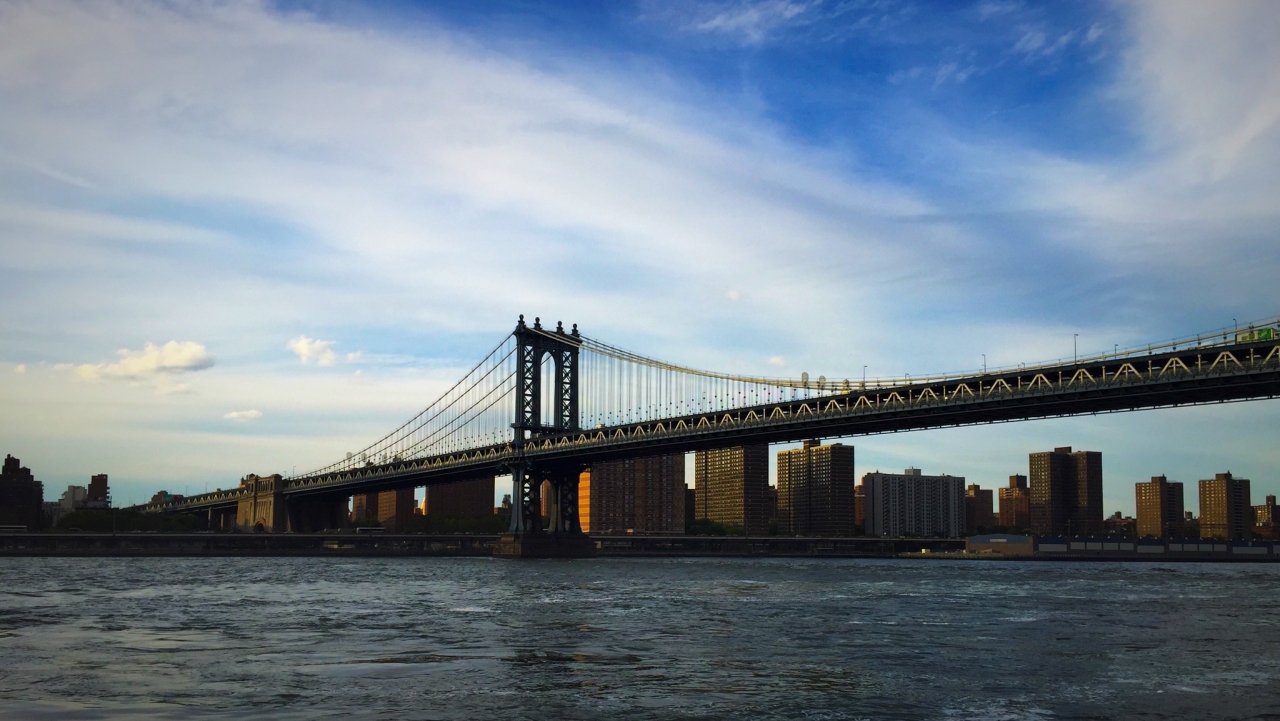
I discovered the ProCam app earlier this year. I had seen it reviewed and praised on some websites and decided to give a try. Within a few months, I realised the reviews were not hyperbole. The ProCam is one of the handiest iOS camera apps I have ever used. The ProCam 3 app replaced several apps on my iPhone 6. I no longer use Vivid HDR, Manual, Camera+, and Slow Shutter Cam. Other than the native camera app, I have no other camera apps on my iPhone. I made a comparison of the output quality of various camera apps, and the TIFF images produced by the ProCam app were better in quality. ProCam app has a slow shutter mode for timelapse, star trails and long exposure photography. I have manual control over exposure, shutter speed, ISO, focus point, and white balance controls. And focus peaking. Yes, the same focus peaking function that can be found in modern high-end digital cameras. ProCam 3 also does Auto Exposure Bracketing (AEB) for creating High Dynamic Range (HDR) images. The app supports JPG and TIFF. I tend to treat the TIFF files as RAW. iOS 10 supports RAW pictures in the iPhone 6S, iPhone 7 and 7S so I may soon give that a try.
Processing
After capturing images with my DSLR, I import them into Adobe Lightroom for editing and post-processing. I have always post-processed my iPhone pictures, using various apps over the years, including Adobe Lightroom Mobile. However, I recently started using an app called Polarr.

"Sunrise at Rodanthe Pier, Rodanthe, North Carolina” — 3 September, 2015 — iPhone 6 + iPhone 6 back camera 4.15mm ƒ/2.2 — 60s at ISO 32
Polarr allows me to edit every aspect of the TIFF images I shoot with ProCam 3 including:
- Exposure
- Brightness
- Highlights
- Shadows
- Saturation
- Vibrance
- Perspective
- Contrast
- Dehaze
- Split Toning
- Vignette
- Tint
- Colour temperature
Whew! Just like in Lightroom (desktop) on my iMac, I can pretty much adjust everything about an image via Polarr for iOS. Polarr has more adjustment features than Lightroom Mobile. Polar comes with many free filter packs to emulate vintage and modern file types, and I can purchase additional filters via in-app purchase. But Polarr offers one feature that I wish the Lightroom Mobile app also had. All the adjustment I make to an image can be saved as a preset. I can reuse those changes on other photos. I can also share my presets on social media. Polar creates a QR code which I can post to Twitter or Facebook. I can reuse filter presets created by other Polarr users only by import a QR code.
Stabilization
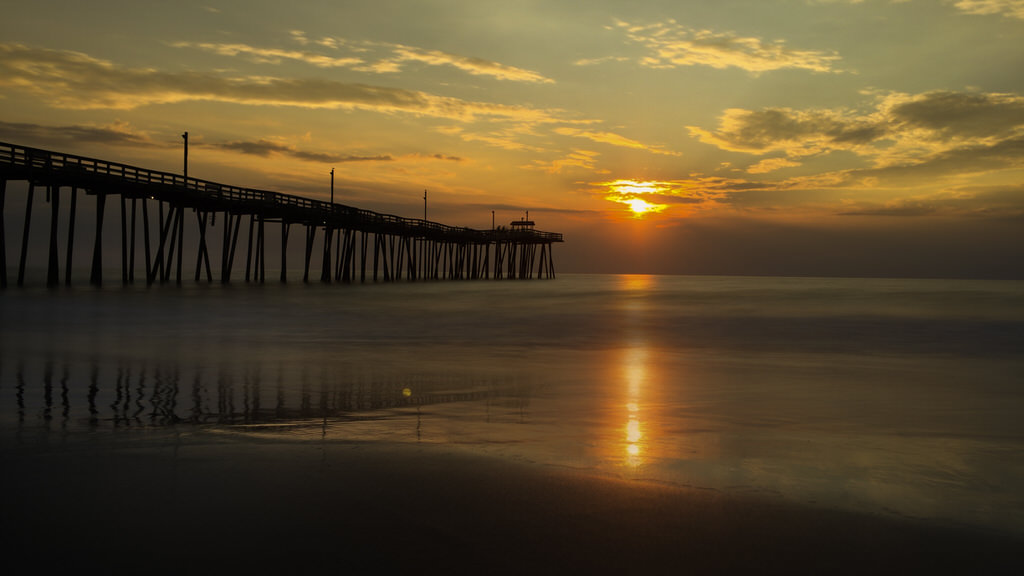
I’m pretty good at holding my iPhone 6 steady while taking photos but long exposure and HDR require that the camera remains stationary. Earlier this year, I bought a small Manfrotto tripod that I use to use with my iPhone.

"Mountain Lakes Nature Preserve, Princeton, New Jersey” — 31 October 2015 — Apple iPhone 6 + iPhone 6 back camera 4.15mm f/2.2 @ f/2.2, ISO 32
The tripod is lightweight, portable and rugged. It's small enough to fit inside a long coat or small backpack. The tripod has a push-button locking adjustment, so I can position the tripod head just where I need it.
Complete Kit
The Manfrotto tripod and two camera apps are all I need to create compelling photographs with my iPhone.
iPhone Camera Kit 2018-Island in the Net
1st September 2018 at 11:49 AMThis Article was mentioned on islandinthenet.com
Syndication Links :
Khürt Williams
14th July 2018 at 12:27 PMIn 2016 I posted about my about my iPhone 6 photography kit which was an update from the photography kit I used in 2015. I bought an iPhone 7 last year and changed my photography kit only slightly but I made some changes to how I process my mobile images.
NOTE: Lightroom CC refers to the new cloud-based desktop version of Lightroom. Lightroom Classic CC refers to the regular desktop version of Lightroom. Lightroom CC mobile refers to the iOS versions of Lightroom CC.
Capture
Adobe Photoshop Lightroom for iOS was released several years ago, has gone through several iterations including a recent name change. Originally a standalone app, Adobe has made the mobile app an integral part of its Creative Cloud (CC) strategy and added features along the way. Over the last year, this free mobile app, now call Lightroom CC, along with an Adobe Creative Cloud Photography plan subscription, has become my go-to software for all my iPhone photography.
My Creative Cloud Photography subscription includes the Adobe Lightroom Classic CC and Photoshop CC desktop app. Apple added RAW support to iOS starring with version 10. Adobe added RAW/DNG support to Lightroom CC mobile soon after.
The app has three shooting modes — High Dynamic Range, Automatic, and Professional. The Professional capture mode gives me complete control over essential camera settings like the shutter speed, the ISO, exposure, and the white balance. Lightroom CC mobile focus mode has a feature that simulates the “focus peaking” feature found on many mirrorless cameras. A green outline around the edge of the objects show the features that are in focus.
Lightroom CC for mobile has Auto Exposure Bracketing (AEB) mode for creating RAW (DNG format) High Dynamic Range (HDR) images. Three images are captured and then aligned, merged, and de-ghosted within the app to create a high dynamic range composite. With the HDR mode, I get a 16-bit floating point image with the full flexibility of a traditional raw file plus the expanded dynamic range of a multi-frame HDR blend.
Processing
Adobe Lightroom CC mobile’s key feature is its synchronization with the desktop versions of Lightroom CC. This Lightroom CC feature syncs developed photos easily between an iPad, Mobile, or Mac.
Lightroom CC mobile has easy-to-use sliders, filters, and quick adjustment tools. Edits on my iPhone are automatically synced everywhere else. I can shoot on my iPhone and edit on my iPad or Mac.
Just like in Lightroom Classic CC on my iMac, I can pretty much adjust everything about an image via Lightroom CC for iOS. Lightroom CC mobile contains all the image adjustments found in the Basic panel of Lightroom Classic CC desktop’s Develop module, such as white balance, exposure, contrast, clarity, and vibrancy. It also includes several presets for applying black-and-white and colour filters (landscape, portrait, and vivid), specific looks, and tones; and a crop tool that can straighten, rotate, or lock the photo’s visible area to specific aspect ratios.
The details section inside Lightroom CC mobile gives me control over sharpness, as well as adding noise reduction tools. I use those a lot. The iPhone 7 sensor is subpar in low light situations. I created a preset in Lightroom CC mobile as a default starting point for my editing.
The one thing lacking that I wish Adobe will do something about is that presets in Lightroom Classic CC cannot be synced to Lightroom CC mobile. However, Lightroom CC users can use the same presets between desktop and mobile. Presets imported through that Lightroom CC desktop version will now sync via the cloud to the mobile apps. The same synchronization also works with colour profiles. The feature works with both purchased third-party presets and user-generated presets.
Like on Lightroom CC desktop, the Lightroom CC mobile app uses the edits already applied to the selected photo to create a new preset. I can select which adjustments to include in the user created preset.
Stabilization
I’m pretty good at holding my iPhone 7 steady while taking photos but long exposure and HDR require that the camera remains stationary. A few years ago I bought a small Manfrotto tripod that I use to use with my iPhone.
The tripod is lightweight, portable and rugged. It’s small enough to fit inside a long coat or small backpack. The tripod has a push-button locking adjustment, so I can position the tripod head just where I need it.
You can learn more about Adobe Lightroom CC on Adobe’s website.
Complete Kit
My mobile photography workflow is snap, edit, post. The Manfrotto tripod and two camera apps are all I need to create compelling photographs with my iPhone.
Adobe Lightroom CC + iPhone 7 back camera @ 3.99mm, 1/1400 sec at f/1.8, ISO 20
Syndication Links :
Khürt Williams
14th July 2018 at 12:27 PMIn 2016 I posted about my about my iPhone 6 photography kit which was an update from the photography kit I used in 2015. I bought an iPhone 7 last year and changed my photography kit only slightly but I made some changes to how I process my mobile images.
NOTE: Lightroom CC refers to the new cloud-based desktop version of Lightroom. Lightroom Classic CC refers to the regular desktop version of Lightroom. Lightroom CC mobile refers to the iOS versions of Lightroom CC.
Capture
Adobe Photoshop Lightroom for iOS was released several years ago, has gone through several iterations including a recent name change. Originally a standalone app, Adobe has made the mobile app an integral part of its Creative Cloud (CC) strategy and added features along the way. Over the last year, this free mobile app, now call Lightroom CC, along with an Adobe Creative Cloud Photography plan subscription, has become my go-to software for all my iPhone photography.
My Creative Cloud Photography subscription includes the Adobe Lightroom Classic CC and Photoshop CC desktop app. Apple added RAW support to iOS starring with version 10. Adobe added RAW/DNG support to Lightroom CC mobile soon after.
The app has three shooting modes — High Dynamic Range, Automatic, and Professional. The Professional capture mode gives me complete control over essential camera settings like the shutter speed, the ISO, exposure, and the white balance. Lightroom CC mobile focus mode has a feature that simulates the “focus peaking” feature found on many mirrorless cameras. A green outline around the edge of the objects show the features that are in focus.
Lightroom CC for mobile has Auto Exposure Bracketing (AEB) mode for creating RAW (DNG format) High Dynamic Range (HDR) images. Three images are captured and then aligned, merged, and de-ghosted within the app to create a high dynamic range composite. With the HDR mode, I get a 16-bit floating point image with the full flexibility of a traditional raw file plus the expanded dynamic range of a multi-frame HDR blend.
Processing
Adobe Lightroom CC mobile’s key feature is its synchronization with the desktop versions of Lightroom CC. This Lightroom CC feature syncs developed photos easily between an iPad, Mobile, or Mac.
Lightroom CC mobile has easy-to-use sliders, filters, and quick adjustment tools. Edits on my iPhone are automatically synced everywhere else. I can shoot on my iPhone and edit on my iPad or Mac.
Just like in Lightroom Classic CC on my iMac, I can pretty much adjust everything about an image via Lightroom CC for iOS. Lightroom CC mobile contains all the image adjustments found in the Basic pane of Lightroom Classic CC desktop’s Develop module, such as white balance, exposure, contrast, clarity, and vibrance. It also includes several presets for applying black-and-white and color filters (landscape, portrait, and vivid), specific looks, and tones; and a crop tool that can straighten, rotate, or lock the photo’s visible area to specific aspect ratios.
The details section inside Lightroom CC mobile gives me control over sharpness, as well as adding noise reduction tools. I use those a lot. The iPhone 7 sensor is subpar in low light situations. I created a preset in Lightroom CC mobile as a default starting point for my editing.
The one thing lacking that I wish Adobe will do something about is that presets in Lightroom Classic CC cannot be synced to Lightroom CC mobile. However, Lightroom CC users can use the same presets between desktop and mobile. Presets imported through that Lightroom CC desktop version will now sync via the cloud to the mobile apps. The same synchronization also works with colour profiles. The feature works with both purchased third-party presets and user-generated presets.
Like on Lightroom CC desktop, the Lightroom CC mobile app uses the edits already applied to the selected photo to create a new preset. I can select which adjustments to include in the user created preset.
Stabilization
I’m pretty good at holding my iPhone 7 steady while taking photos but long exposure and HDR require that the camera remains stationary. A few years ago I bought a small Manfrotto tripod that I use to use with my iPhone.
The tripod is lightweight, portable and rugged. It’s small enough to fit inside a long coat or small backpack. The tripod has a push-button locking adjustment, so I can position the tripod head just where I need it.
Complete Kit
My mobile photography workflow is snap, edit, post. The Manfrotto tripod and two camera apps are all I need to create compelling photographs with my iPhone.
Adobe Lightroom CC + iPhone 7 back camera @ 3.99mm, 1/1400 sec at f/1.8, ISO 20